


articles/Printers/8steps-page2
by Mike McNamee Published 01/06/2006
The Print Engine
The print head uses Variable Size Droplet technology to produce an ink droplet as low as 1.5 pico litres, the smallest currently available in the world. This enables a maximum resolution of 5760 by 1440dpi, as fine as one could conceivably need. This may explain the smoothness of the graduations along the tone range even without the smoothing effect of a light black. The printer is fast, claiming a 10x8 in 68 seconds at 1440dpi. In our tests, at Best Quality, we were making full coverage, A4 prints in around 2m 45s.

The Mechanics
This printer is quite a different style to its predecessors (the 1290 and 2100) being more angular in overall form. The support trays are now built in and, by clever design, they fold away when not in use, thus keeping the inevitable dust at bay. The smoked top cover lifts to reveal the 8-cartridge bay and the paper transport system. Gratifyingly the printer continues to work when the lid is lifted so you can see everything is proceeding correctly - this is important if you wish to panic and stop the printer wasting ink for any reason! The printer will accept sheet fed papers, roll paper, CDs and, from the rear entry slot, heavy fine art papers. The rear entry is tight to the back and requires a very small amount of rear desk space. The downside is that the printer does not accept the 1.2mm boards currently gaining popularity (on the 2100 you need as Epson Premium Semigloss Photo paper (PSGPP)
This media was supplied in A3+ format enabling us to make some larger prints. Using Best photo quality and with "High Speed" turned on, we got a nominal 13x19 inch print out in 5m 21s.
We built a bespoke profile and audited the resulting print with excellent values. The Dmax was a little inferior to the gloss media at 2.25 but, nevertheless, another really good result. The colour errors are tabled. The gamut volume was 887,921 another whopper!
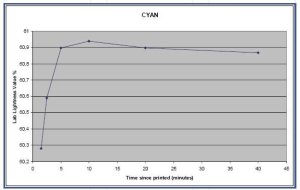
The majority of the colour errors were in the lightness channel and the skin tones were rotated a little towards yellow. This effect was initially also observed with the gloss media and raised our suspicions that the Glop was taking a little longer to dry/cure even though the prints were dry and smudge-proof almost as they came out of the printer. No changes in density were discernable to the eye but to test our theory we made three small swatches of cyan, magenta and yellow and fed them directly into the spectro followed by time-spaced testing. As the graph shows, there is some lightening of the tone over the first 10 minutes, after which it seems to stabilise. There was also a colour shift of around 3 ÄE in the magenta (less in the other two colours) as the Glop cured. None of this should worry the majority of users but if you wish to bespoke profile using this printer you are advised to wait for 15 minutes before starting (go have a cup of tea!).
There are 0 days to get ready for The Society of Photographers Convention and Trade Show at The Novotel London West, Hammersmith ...
which starts on Wednesday 15th January 2025


SWPP - Society of Wedding and Portrait Photographers
The Society of Photographers
Clwyd Chambers, Clwyd Street, Rhyl, Denbighshire, LL18 3LA, UK
Tel 00 44 (0) 1745 356935
Home Page - Find a Photographer - Benefits of Membership - Events and Seminars - Who's who - Photographic Trade Directory - About - Qualification Structure - Mentor Me Programme - Professional Imagemaker Magazine Articles - FREE information pack - Privacy