articles/Printing/absolutepuzzle-page2
Absolute Puzzle - part 2 of 1 2 3 4
by Mike McNamee Published 01/08/2002

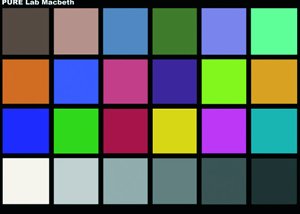
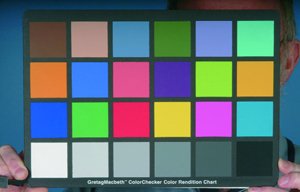
The Macbeth Color Checker. On the top row Dark and Light Skin, Sky, Foliage, Blue Flower, Blue Green. Row 2 Orange, Mid Blue, Moderate Red, Purple, Lime and Lemon.
Lab colour is the native colour space of Photoshop (although it usually works in the background and you are not necessarily aware of it). It is not normally used for colour editing but perversely is commonly used to express the error between two non-matching colours (more of that later).
This leaves HSB and CMYK. HSB is very useful for examining colour numerically in the Photoshop Info Palette but is slightly limited by its absence from both the Levels and Curves palettes.
CMYK has the advantage (for presswork) that it is the final colour space to which the image is destined and also it is the more intuitive, subtractive (ie paint mixing) system. The table shows the parameters that Macbeth Light Skin should adhere to in a number of colour systems. The nearest equivalent Pantone colours are Pantone Coated 479 CVC and Pantone Process 51-6 CVS. Both these colours are within 3 Delta-E Lab points of the specified colour. You find variations in the values displayed for skin tones depending on the colour space and viewing parameters. For example Photoshop displays Light Skin hue angles of 23° for Adobe RGB (1998) and 19° for sRGB. X-Rite Colorshop gives a hue angle of 21°. One advantage of considering flesh tones by hue angle is that the hue should remain reasonably constant across a slightly side lit face.
In summary then the skin tones should have hue angles between 6° and 30°. In CMYK you should have a yellow percentage equal to or higher than the magenta and the cyan should be between 1/5th and 1/3rd of the magenta. If present, Black (K) should be counted as cyan. RGB values vary with the colour space and both they and the Lab colours are shown in the table. For Mediterranean complexions the yellow might rise to as much as 50% higher than magenta and the Asian complexions often contain a higher percentage of yellow. Black (eg Afro-American) skin tones frequently have the same hue angle as Caucasian skin tones, they are just darker (the Macbeth Light and Dark skin tones both have hue angles of around 22°).

Before you commit to printing or despatching a file you should check and see that your flesh tones are within these boundaries and re-check carefully if they are not. Depending on the model and the exact shooting conditions, the values might be well outside those listed, but at least double check so that you don't get a nasty surprise downstream in your workflow!
Having set the boundaries within which we might expect to find our skin tones we need to explore how close our imaging system can get to reproducing them accurately. To do this we need to measure colour error. This may be done in several ways but all methods are based on positioning the colours in a 3-dimensional space and then measuring the distance between them. The length of this imaginary line between the two colours is the colour difference and is referred to as Delta-E. It is usually suffixed with a tag to indicate which colour space and calculation method has been employed eg Lab, Luv, CMC. For this article we will only be using Lab.
For good quality reproduction (say glossy magazine standard) you might anticipate a Delta-E range between zero and 7 across a range of colours. An average error of more than 10 will still be a saleable print providing the error is not (for example) all piled into a green bias in flesh tones. If you measure a number of photographic magazines you will find errors in the rendition of Macbeth Charts going out to between 20 and 30 points. The largest error we measured for this review was a whopping 51 points in a photographic magazine which was trying to compare the performance of two types of film - there is little chance of making any sense of such a review with errors on that scale!
How Good is your Initial Image?
We shot a Macbeth Chart in the studio using a Fuji S1 Pro. Light was provided by two Bowens Espirit 500 heads, driven into identical softboxes. No other light sources were present (ie no windows or lights) and the White Balance of the camera was adjusted for the conditions using the Custom setting. The exposure was checked using the Histogram on the Fuji and we accepted our first and only shot. It was made using the 400 ASA setting at full resolution in TIFF mode.
Please Note:
There is more than one page for this Article.
You are currently on page 2 Contact Mike McNamee
1st Published 01/08/2002
last update 09/12/2022 14:50:45
More Printing Articles
There are 0 days to get ready for The Society of Photographers Convention and Trade Show at The Novotel London West, Hammersmith ...
which starts on Wednesday 15th January 2025


