articles/Cameras/cameracalibration-page4
Camera Calibration - part 4 of 1 2 3 4
by Mike McNamee Published 01/02/2006

The expodisc in use to correct for both white balance and exposure level. Note that the warm white balance at 2950K is brought back to a neutral 5450K by click balancing in Adobe RAW and that the histogram is centred by the 0.85 stop exposure shift.
With the images that had been calibrated or assigned accurate profiles, we found that the printed result lacked a little saturation which is why we increased the saturation by 20 points in Adobe Camera RAW. This lifted the more saturated pigments closer to our true pigment colour but tended to leave the deep red under saturated in the print. Our conclusion is that the +20 saturation was leveraging the saturated colours more than the deep red, leaving it behind. This was the frustration we spoke of earlier, we got most of the sheep into the pen but one was always slipping away - at no stage could we get all of them in the pen together! The pigments seem well inside the printing gamut of the Epson K3 in set and the metameric index for the K3 inks was, in every instance, lower than that of the oil paint. Changing between a relative colourmetric and perceptual rendering intent had little effect, again suggesting that the colours are within gamut. The Monaco Gamut Works confirmed that we were just within gamut for Premium Lustre on all the pigments. For Epson Ultrasmooth Fine Art paper we were outside gamut mainly on the lightness channel but also on the colour parameters as well. For Epson Watercolour Radiant White we were almost in gamut for all pigments. We recognise that our testing of the calibrations on a non-art paper was a slightly false premise but we were curious to find if the pigment set was impossible or just plain difficult! It is also quite interesting that increasing saturation of the image in order to tune the pigment colours also drove much of the Macbeth SG chart out of gamut.

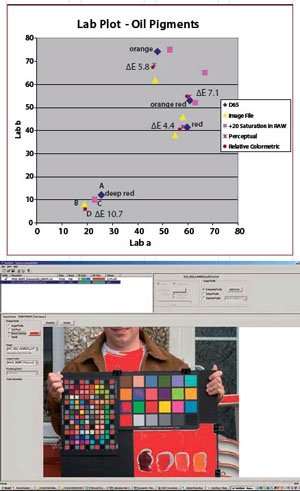
Top: Pigment Progress: In order to understand what is happening as colours are adjusted, you have to follow a Lab plot (start by doing your homework at the end of the Paper Chase feature). In this Lab plot, the pigment locations are plotted as blue diamonds and named. Follow the progress of the deep red pigment. The starting colour A is desaturated to position B by the camera. The +20 saturation shift in Adobe RAW moves the colour back up the saturation curve to position C. The printer then desaturates the colour so that it ends up close to its original position and this is the residual error we were left with. The progress of the other colours follows the same pattern except that the shifts are somewhat greater but the final result is actually more accurate. The final errors from pigment to print are shown alongside each colour and range from 4.4 to 11.2.Below: The pigments are all within gamut when the Epson Premium Luster paper is used. This is a grab from Monaco Profiler Gamut Works which highlights out-of-gamut colours in red.
Conclusion
Overall we seem to have proved that these particular oil pigments, although difficult, are possible to render satisfactorily. Quite rightly, it would be necessary to reproduce a full painting to the satisfaction of the artist to bring the experiment to a truly successful conclusion. On the way however we have completed our testing of ACR-Calibrator and expodisc, two issues that were left behind in part one of the series. Finding out just how good ACR is was a major step, validating the several days testing it required.
Please Note:
There is more than one page for this Article.
You are currently on page 4
- Camera Calibration page 1
- Camera Calibration page 2
- Camera Calibration page 3
- Camera Calibration page 4
1st Published 01/02/2006
last update 09/12/2022 14:52:06
More Cameras Articles
There are 0 days to get ready for The Society of Photographers Convention and Trade Show at The Novotel London West, Hammersmith ...
which starts on Wednesday 15th January 2025


