articles/Photoshop/capturefidelity-page1
Capture to Output Fidelity - part 1 of 1 2 3
by Dave Montizambert Published 01/01/2006

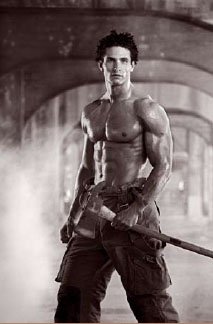
For the past five years back over here in the colonies (British Columbia, Canada), I have been doing an annual two-day shoot for the Vancouver Firefighters' Association producing thirteenplus images for their "Hall of Flame" calendar. The calendar raises money for Vancouver's under-funded burn treatment centre. Some 30 firefighters try out for the calendar. Thirteen are chosen, by a panel of female celebrities at a media party, a month or so prior to the shoot date. One lucky firefighter gets to put his fidelity to the test on the front cover while the other 12 almost-as-lucky contestants get to test their fidelity inside the calendar, one for each month. My job is to deliver digitally captured images with impact that will reproduce well in several different output media and do all of this with only 45 minutes per firefighter, on location, with full lighting, generators, fire trucks, fire equipment props, and changing weather/ambient light conditions.
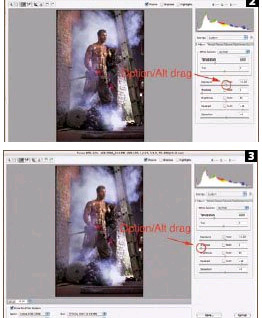
During postproduction in Photoshop CS2, I converted the images into RGB black and whites, introduced a digital sepia effect, and then shifted the firefighters' soot-stained yellow pants to fire-engine red. The look for the calendar is always the heroic, stoic male, set against harsh surroundings, ready to save the day. For me this technically translates into high contrast, moody images where lighting, exposure, and digital densitometer values are key. Since I can create more range than can be printed, I always invest time up front reading the brightest and darkest critical tones in the image to make sure that they will print well. This can be done in Adobe Photoshop's Camera RAW, in your camera's proprietary software or in Photoshop once the image has been processed. If the scene contrast is too much or too little I adjust the lighting to get it right - it is generally faster to fix it at time of capture than it is after the fact in Photoshop. After the lighting has been roughed in and metered, I shoot directly, via Firewire into my laptop, which is mounted on a tripod and placed right next to the camera. Several test shots are made, and then I open the RAW files in Camera RAW, setting the Adjust sliders and curve points relative to readings from the densitometer eyedropper tool. To find the brightest, most significant point in the image, I depress the Option (Mac) or Alt (PC) key while dragging the Exposure slider (see image [2]). This throws the image into Threshold mode. Sliding the Exposure slider all the way to the left makes the image drop out to black. Slowly dragging the Exposure slider towards the right will cause posterised

The first points that appear are the very brightest points in the image. In Threshold mode it is sometimes hard to see what these areas actually are. To bring back the normal image for a quick peek, let go of the Option/Alt key - you can easily toggle back and forth this way to bounce in and out of Threshold mode. At this point I make the decision whether the area showing is a significant point that needs to retain detail in the final printed piece or not. If so I set this point to the brightest tone that will hold detail in final reproduction. This is done by dragging the Exposure slider left or right while reading the densitometer RGB values under the eyedropper tool. The same procedure is repeated only this time Option/Alt dragging the Shadow slider from the left to the right (see image [3]). At the far left, everything goes to white, the first tones that show up as you drag to the right are the darkest tones. The same procedure for finding brightest and darkest significant points can be done in Photoshop using Levels - Option/Alt drag the right (highlight) input slider to the left and Option/Alt drag the left (shadow) input slider to the right.
Keep in mind that not all images contain a significant highlight or shadow point that you can set to the brightest or darkest tone that will still print with detail. That is to say that their natural range of contrast may be low. You may run across this with copy work of watercolour paintings, or images taken in foggy conditions, or a wedding invitation on a white linen tablecloth. In cases such as these, pick the brightest or darkest points and set them to a value that seems appropriate. That "appropriate" value may be well within the brightest or darkest printable tonal range - an image of a wedding invitation on a white linen tablecloth may not contain any tones darker than a quarter-tone (64 levels). To force this point down to the darkest printable brightness would totally change the reality of that image making it very contrasty. Within limits, If your monitor is profiled, you can judge these values on screen. If time permits, it is a really good idea to soft proof your adjustments by printing the image on a decent ink-jet that has been profiled. If you have a series of images, print them as a contact sheet to save time and materials. Of course wedding photographers who print proofs are, essentially, already doing this.
You are currently on page 1
- Capture to Output Fidelity page 1
- Capture to Output Fidelity page 2
- Capture to Output Fidelity page 3
1st Published 01/01/2006
last update 09/12/2022 14:52:14
More Photoshop Articles
There are 0 days to get ready for The Society of Photographers Convention and Trade Show at The Novotel London West, Hammersmith ...
which starts on Wednesday 15th January 2025


