articles/Photoshop/colourcorrectioncurves-page2
Colour Correction - Curves and Adjustment Layers - part 2 of 1 2 3 4 5
by Mike McNamee Published 01/02/2007

1. The unmodified curve with no control points. Input values all equal output values.
2. The black values (left) are elevated and the highlights are depressed, this effectively reduces the contrast.
3. The curve is steepened, increasing the contrast.
4. The curve is completely reversed, creating a negative of the original.
5. The mid tones are lifted out to the upper left which lightens them.
6. The mid tones are dragged down and right which darkens them.
NOTE:
The curves are shown with RGB (0-255) and shadows on the left at the bottom. If you click on the double-facing arrows at the middle base of the curve frame, the values are shown as % and the tones are reversed.

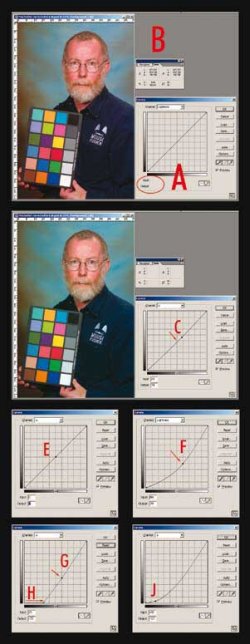
1. The values are greyed out at A because no control points have been set on the curve. At B the Info Palette shows the values of the target swatch, the light skin tone.
2. The a curve control point has been moved from 20 to 14 in the direction indicated by the arrow, shown at C.
3. The control point pinned at E is the colour biased one, which should, in reality, be at the position shown at F in #4.
5. The aim value of the control point can be moved to an identical position by shifting the base of the curve along (as at H). This will affect the other tones in a different way and if the nature of the colour bias is described by such a straight line then this will be a more effective curve move. You have to check other colours to determine this.
6. The greatest risk when curve driving is if a tone at the ends of the curve (top or bottom) is moved and drags the other parts of the curve in a disproportionate way. Again, you have to look at your curve and other colours to determine the best way to get around this.
STOP PRESS
Things never stay still for long. Since this piece was written Photoshop CS3 has appeared, complete with even more sophisticated curve controls, which are also linked to the histogram display. The basics of what we say above remains true, the implemenation has been made easier.
Please Note:
There is more than one page for this Article.
You are currently on page 2
- Colour Correction - Curves and Adjustment Layers page 1
- Colour Correction - Curves and Adjustment Layers page 2
- Colour Correction - Curves and Adjustment Layers page 3
- Colour Correction - Curves and Adjustment Layers page 4
- Colour Correction - Curves and Adjustment Layers page 5
1st Published 01/02/2007
last update 09/12/2022 14:52:40
More Photoshop Articles
There are 0 days to get ready for The Society of Photographers Convention and Trade Show at The Novotel London West, Hammersmith ...
which starts on Wednesday 15th January 2025


