articles/Lens/depthoffield-page5
Depth of Field - part 5 of 1 2 3 4 5
by Mike McNamee Published 01/08/2007

INCREASING DEPTH OF FIELD
Normally you increase depth of field by stopping the lens down. Eventually you run out of steam with this method as the effects of diffraction start to degrade the image - you get more depth of field in an otherwise fuzzy image! Diffraction becomes noticeable after f16 on most lenses. In a macro image, as you move the lens further away from the camera, to increase the magnification, the aperture 'seen' by the chip is even smaller (it is further away). Thus at 1:1 an aperture set at f16 is really f32 with the depth of field benefits that this bring along with a bucket load of diffraction. In many instances therefore it is just not possible to get sufficient depth of field, even with limitless amounts of lighting power available.
A solution, developed in the 80s was to place the subject on an accurately movable table and make multiple exposures with a sheet of light from a laser. Apart from the obvious disadvantages for field photography, the system cost hundreds of thousands of pounds. Today's equivalent is a software fix in which clever imaging analysis is used to reassemble a series of shots, made with the camera moving through the subject focus pane. Almost unbelievable this software is free - how cool is that? It is the brainchild of a gifted amateur photographer and computer programmer called Alan Hadley and is called Combine ZM. The work put in by Hadley over the past six years is quite remarkable but it does show the power that can be harnessed by skilled hands using the computing power we have available today - and he did it just for fun! There are some wonderful examples of work made with Combine ZM if you Google for them but try http://www.dgrin.com/showthread. php?t=61316 for starters. We include here some of our initial attempts.

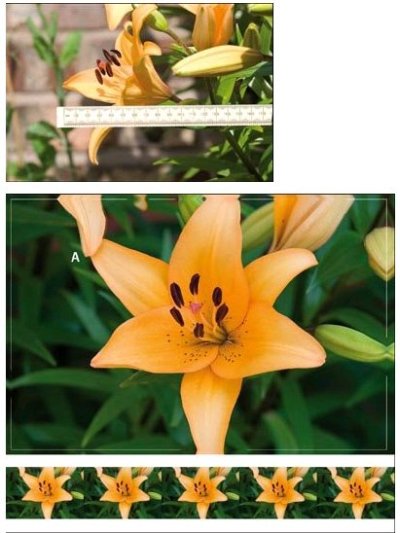
THIS PAGE: With over 100mm of depth to be covered this lily presented a real challenge for conventional macro even at small apertures. Five shots were made at 20mm increments before combination using Combine ZM. The large shot below is what was created without any clean-up. Note the repeat pattern of the image outside the white annotation line and the slight ghosting in the petal at point A. These may be cleaned up by cropping and cloning. The side-on shot in this box shows that the software can be fooled when there is inadequate detail and contrast - here the two stems have been merged into one.
Please Note:
There is more than one page for this Article.
You are currently on page 5
- Depth of Field page 1
- Depth of Field page 2
- Depth of Field page 3
- Depth of Field page 4
- Depth of Field page 5
1st Published 01/08/2007
last update 09/12/2022 14:53:14
More Lens Articles
There are 0 days to get ready for The Society of Photographers Convention and Trade Show at The Novotel London West, Hammersmith ...
which starts on Wednesday 15th January 2025


