articles/Lighting/digitaldirectionspowerprofiles-page1
Digital Directions Power Profiles - part 1 of 1
by Dave Newman Published 01/02/2007

It has now happened that some students in my seminars have NEVER used film. Yes, never! Wow, we have come down a long awkward trail to what I believe is equipment that is now much better than we are, and we are now experiencing new levels of control and creativity. Little has changed, however, in producing large-canvas, quality, studio portraiture. Although, capture may have changed with leaps and bounds, classic guidelines for carriage trade portraiture remain with us.
As I see the great gap of "Happy Snappers" coming frightfully closer to the artful journalistic attempts, it convinces me that we just might be making a more positive separation into professionalism by presenting and providing our best clients with the classic studio images. Such images are unobtainable to amateurs.
It has always been my goal (based on years of experience and ultimately the sale of portraiture) to adhere to the five views of the human face, when posing and lighting individuals.
a. Profile left view
b. Profile right view
c. 2/3 left view
d. 2/3 right view
e. Full front view.
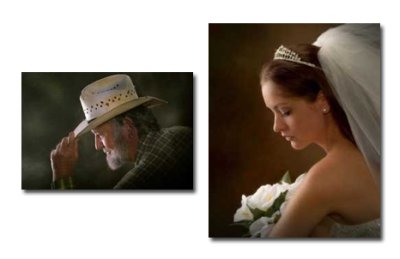
Of all five, the profile is by far and above, the most dramatic and unique view of the human face. When correctly lit, the pure profile is an art form unto itself. Of course, not all subjects provide facial features complimented by such treatment, and to continue with such an angle would be fruitless. Those, however, that do measure up, viewed under such rear-quadrant key lighting, are in for a new and exciting presentation in portraiture.
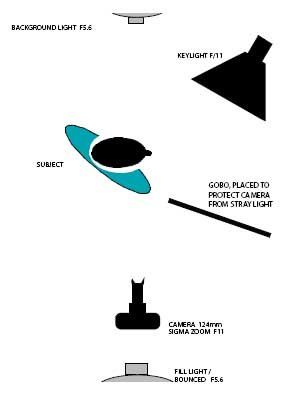
Lighting must come from the rear quadrant and be aimed, frankly, into the camera's lens. Here is an important opportunity to use a flag or gobo plus a lens shade to protect the lens from unwanted light.
Briefly, my guideline for such lighting and posing would run along these lines:

Seek to find a proper "home" for the placement of the profile (plain wall or uncluttered background work best).
Seek to provide contrast (usually darker background areas works best).
Seek to provide a profile "clean" of any hair or rear facial parts peeking in from the backside.
Seek to keep a 3:1 or greater ratio between key and studio's fill light.
Keep in mind that the angle of incidence equals that angle of reflectance (placing the keylight into the rear quadrant does in no way diminish the power of that light...as long as the subject-to-light remains constant...in fact, it can retain a high level of efficiency. Add excitement to profiles by utilising lateral tipping of the camera: this adds a high level of creative impact. Keep in mind that the tremendous control you have with studio lighting and posing can create added interest, well beyond that amateur Happy Snapper... or even your local competitor's efforts.
Dave Newman
More information: davenew@mindspring.com
You are currently on page 1 Contact Dave Newman
1st Published 01/02/2007
last update 09/12/2022 14:53:19
More Lighting Articles
There are 0 days to get ready for The Society of Photographers Convention and Trade Show at The Novotel London West, Hammersmith ...
which starts on Wednesday 15th January 2025


