articles/Lighting/dm-apertures-page1
Dave Montizambert's Creating With Light Part 3s Apertures - part 1 of 1 2
by Dave Montizambert Published 01/08/2014

It seems to me that more and more advanced amateur as well as professional photographers are relying on their cameras' auto features and so as a result, have forgotten or have not bothered to learn their photographic basics, basics such as exposure, and so I would like to zero in on exposure control with aperture. So why are photographers not learning the basics such as exposure any more?
I believe they are not learning it because it is a little tricky to grasp and since we are becoming more and more of a instant gratification society, and because our cameras are so good with their intelligent autoexposure features, most people just want to jump into taking pictures right away without actually learning what it is they're doing. I do realise that you can get some decent images with 'point and shoot' photography using auto features, but to get truly creative with photography, one needs a greater understanding of their craft because the camera's intelligence is a sorry replacement for your intelligence if you want to step beyond just recording existing lighting contrast and create something from your imagination that is truly wonderful and to do it with precision. When we learn new things, unless you implement them immediately and use them frequently, you soon forget them - many photographers have had basic training where they learn about apertures, shutter speeds, and ISOs plus the relationship between these three, but don't truly understand what they learned because they don't implement and practise it. That's why good photographic trainers, when teaching the basics, forbid their students to use any auto features and often make their students black out their image preview LCDs on the back of the cameras and then give many assignments that force them to utilise this new knowledge - perhaps more photographic dominatrix than teacher is the key here - to integrate new knowledge you need to do it over and over again until it is second nature, repetition is the key.
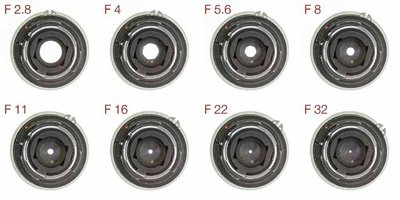
To control exposure with our cameras, we have three controls: shutter speed, ISO and aperture. Adjusting exposure by shutter speed or ISO it is pretty simple to understand: for instance changing shutter speed from 1/60th to 1/30th is a one stop increase in brightness and changing 1/250th to 1/500th is a one stop decrease in brightness. And with ISO, changing from 800 to 400 ISO is a one stop increase in brightness and changing 100 to 200 ISO is a one stop decrease in brightness. This is easy for most to grasp, but photographers often find the concept of apertures and how they work harder to comprehend and remember. Apertures are harder to understand because each single stop increase or decrease does not double or half the last f-stop number, that is because these numbers represent area and area is a two dimensional concept so it is always height times width and not a measure of a single dimension (not just height or not just width). For the f-stop number to double you have to increase or decrease the aperture by two stops which increases or decreases the volume of light hitting your camera's imaging sensor by four times or 1/4 (see Image 001). This is a little confusing if you haven't a handle on Sir Isaac Newton's Inverse Square Law which I talked about in my last article entitled 'Inverse Square' (June/July issue of Professional Imagemaker).
To compound the confusion, bigger f-stop numbers represent smaller holes and smaller f-stop numbers represent bigger holes. In addition to this, you need know that they are related but are two different things.
To avoid confusion always think about the area of the opening of the aperture in question, that is to say 'the size of the hole' - if it is bigger then more light gets onto the imaging sensor, if it's smaller then less light gets onto the imaging sensor. Apertures such as f 2, f 2.8, and f 4 have much larger openings than apertures f 11, f 16, and f 22 (see Image 001) and so allow more light into the camera. We use these smaller numbered apertures with their larger openings to allow more light onto the imaging sensor when there is less light in the scene. Conversely, we use the higher numbered apertures with their smaller openings to allow less light onto the imaging sensor when there is more light in the scene. In other words, if the scene meters dark then you need bigger aperture openings to allow more light in so as to avoid an underexposed image, and if the scene meters bright then you need smaller aperture openings to allow less light in so as to avoid an overexposed image. Think of it this way: when your meter says 'f 22' it's telling you that there's so much light hitting its light measuring sensor that you better use this smaller aperture opening to avoid overexposure, and then conversely when your meter says f 2.8 it's telling you that there's so little light hitting its light measuring sensor you better use this larger aperture opening to avoid underexposure.
You are currently on page 1
- Dave Montizambert's Creating With Light Part 3s Apertures page 1
- Dave Montizambert's Creating With Light Part 3s Apertures page 2
1st Published 01/08/2014
last update 09/12/2022 14:53:23
More Lighting Articles
There are 0 days to get ready for The Society of Photographers Convention and Trade Show at The Novotel London West, Hammersmith ...
which starts on Wednesday 15th January 2025


