


articles/Lighting/endgamesecond-page3
by Dave Montizambert Published 01/02/2006
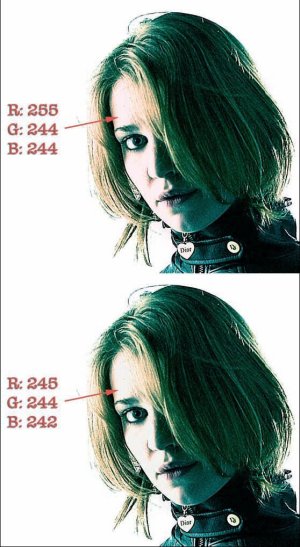
Once you have processed the image with your standardized processing - be it a JPG or Raw workflow - open it into Photoshop. Read the same-metered spots of the subject in Photoshop by placing your cursor over the appropriate areas and noting the number values displayed in the Info palette. Now we need to label the digital image with the metered values and with the Info palette readings:
Select the Line tool from Photoshop's tool bar (or type the letter "U" with the shift key held down as many times as it takes until the Line tool is selected). From the tool options bar at the top of the Photoshop window set arrowhead size to taste. Click and drag arrows that point to the metered areas. Double click on the Foreground colour swatch at the bottom of the Tool bar then select a suitable contrasting colour for your arrow. Make the Path palette visible then click on the "Fill Path With Foreground Colour" thumbnail (white to black gradated circle) at the bottom of the palette. With the Type tool selected, label the "arrowed" spots with the metering values and with the colour values from the Info Palette read-out.
I use this test for pre-visualizing densities only. To develop this ability for colours would be near impossible since the combinations of values in the three channels is staggering. Reading luminance or brightness values only would be a much easier method than reading RGB values, however Camera Raw and Adobe's new application for image processing and viewing called "Lightroom", read only in RGB. If you want to read brightness/luminance values only, and will only be doing this in Photoshop, then set your Info palette to Lab or HSB colour mode. Read only the L channel in Lab or only the B channel in HSB. You could use Greyscale too, but keep in mind it reads ink density percentages not brightness or luminance values. For this reason 100% in
Greyscale mode equals pure black and 0% equals pure white. Once your image is properly labeled with arrows and values, have it printed out using whatever media you sell your work on. If you are a wedding photographer you may have to send the file out to the lab, or you could print it out on your inkjet. If your work is usually printed on a printing press you may want to settle for seeing a "soft-proof" print from your inkjet since printing this test on a press would be cost prohibitive. I would suggest printing the image out to a handy size like 5x7 inch. Place this print in a small binder that you can carry around in your camera bag and/or next to your computer display. Next time you are spot metering prior to shooting and are wondering what a minus two value on a tux will actually look like when printed, or next time you read a bride's white dress in Photoshop and wonder how bright a 238 red / 238 green / 238 blue will look when printed, you can refer to your test image. In fact, over time, collect labeled test images from various shoots that you do and add to your book, after a short time you will find that you will not need the reference book any longer because you will have developed a feel, when metering or when reading the Info palette, for what values will look like in print. You will be able to see through numbers, you will be a crack print value recognition expert. That ought to be worth a free pint or two!
There are 0 days to get ready for The Society of Photographers Convention and Trade Show at The Novotel London West, Hammersmith ...
which starts on Wednesday 15th January 2025


SWPP - Society of Wedding and Portrait Photographers
The Society of Photographers
Clwyd Chambers, Clwyd Street, Rhyl, Denbighshire, LL18 3LA, UK
Tel 00 44 (0) 1745 356935
Home Page - Find a Photographer - Benefits of Membership - Events and Seminars - Who's who - Photographic Trade Directory - About - Qualification Structure - Mentor Me Programme - Professional Imagemaker Magazine Articles - FREE information pack - Privacy