articles/Weddings/fisheyeview-page1
Fish's Eye View - part 1 of 1 2 3
by Jon Jenkins Published 01/10/2008

When trying to add different elements to my wedding photography, I usually look at different ways I can pose people or use architecture to add more to my compositions. Looking at different equipment to achieve something new is normally the last thing on my list. That is until recently. In early June, I attended a seminar in Devon with Gordon McGowan and David McGirr. Both of these photographers use a quite simple set-up of kit and achieve excellent results. One thing they have in common is the use of that mystical piece of glass, the fisheye lens. Before going to Devon, I called a friend of mine who had a fisheye lens to see if I could borrow it for the seminar, just in case these two guys started showing me their fishy stuff. The problem with the lens I borrowed was it was a bit faulty - it was stuck on f22 and didn't open up. The other problem was that it was very dark to look through and the metering thinks you're having an eclipse. Not to be put off using this new toy, I decided I would have a play with it anyway. Working in manual and using the screen as a meter, I was getting to grips with this new view on life. I took some lovely shots that David had set up at the seminar.
I was now bitten by the bug. The seminar was on the Monday and by Wednesday I was the proud owner of a (working) fisheye lens. I had been spoilt for choice with the vast number of fisheye lenses available for my cameras. I wasn't going down the budget avenue as I need quality reliable equipment, so I had four choices available to me:
Canon 15mm
Sigma 15mm
Tokina 10-17mm
Sigma 10mm (for crop factor cameras).
My first choice was the Canon 15mm for use on my 5D. The only problem I found here was I didn't have a spare, full-frame camera that I could use to have the fisheye on a permanent body. To get the best use of a fisheye at weddings, and for me to get used to the niche qualities of this sort of lens, I would need it at hand all the time so I could get the full benefits. The cost of a Canon 15mm fisheye lens on its own body would set me back an extra £1,200 for a new 5D and so both Canon and Sigma 15mm lenses turned out to be outside the budget.
The Tokina 10-17mm was my next option. This could be used on both full-frame and APS-sized sensors. I could not find a local retailer who had one in stock, and I was reluctant to order one blind as I couldn't find a comparison of fisheye lenses that included the Tokina anywhere on the internet. I was wary of the 10-17mm zoom as fisheye lenses are usually a fixed focal length and therefore a third-party company having a go at a zoom fisheye might not turn out to be very good. So my thoughts moved to the Sigma 10mm fisheye for APS-sized sensors. I have a 'spare' 40D body that could be used to take the fisheye; if I wanted to then provide its own camera body, it wouldn't cost the earth. After much deliberation, I found myself edging towards the 10mm Sigma. I was also even considering buying the Nikon 10.5mm lens and a Fuji S5 body to go with it, as the Fuji is a relatively inexpensive camera. But I'm not used to Nikon (or Fuji) and there is also the extra cost of buying a new body when I have a Canon ready and waiting.
That was it. I decided to go for the Sigma 10mm, even though, at around £400, I could have bought the Canon 15mm cheaper. But I had saved the trouble of swapping lenses on my 5D and also the cost of a new body. The 40D body isn't the most compact (might think about a 450D) but without the grip and the not-so-big fisheye lens, it's not too bad for a camera that's always on the 'other shoulder' ready and waiting for when the moment arises. With this new bit of kit I was now ready to put it into action.

When I have new kit, I do find it useful to have a little play with it before going out on a wedding. This was the most fun but also the most difficult equipment to get a feel for before the wedding. Let me explain. With most new equipment, you can usually predict what it's like to use, but with the fisheye, everything in the world looks different. Sitting at my desk taking photos of the objects around me, everything looks so different in the camera and when I took it outside, the whole world looked weird. Without the use of models (my kids and wife tend to run away when I get my camera out), it's difficult to predict what a bride and groom will look like in the frame. So after a few days' play with the lens, I thought I would unleash it on my brides. With it being a quite compact set-up, I could keep it on me at all times and just have a try with it when the moment arose. I set the camera on Program and did my normal work with my usual set-up and just brought the fisheye into play when I felt the time was right. If all went wrong, I had my usual shots in the bag anyway.
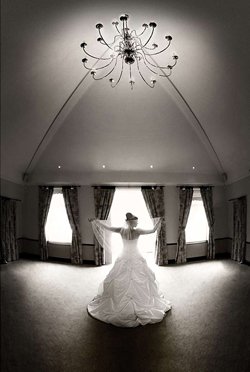
So there I went, off to my first wedding with the fisheye lens on my Canon 40D ready for action. Using the fisheye on weddings did seem a little tricky - working on weddings you do need to get the job done quickly. A fisheye lens does need a bit of time to compose the images correctly. When I saw the opportunity to try the lens, I would set up the shot that I would normally take quite wide and get the 'safe' shot in the bag. Then I would try the fisheye, keeping it on Program setting so as to not get too involved in exposure while taking the shots as the composing was taking a little time. Having no zoom facility in the lens, you have to use the 'manual zoom' and get walking. I am not used to this on a wedding, I use my zoom a little more often than I really should. However, I found I was in the realms of 'real photography' and having to move around to compose.
On the first wedding, things moved quite quickly throughout the day and I didn't get too much chance to use the fisheye, although there were moments when I did have time to give it a go and I got some nice shots. Arriving at the church to greet the boys, I was met with my first real task for the fisheye, as the groom arrived in a gorgeous Morgan car. The problem was where to park it for a good photo. As usual with weddings, you can only really play with what you have on the day. The driver parked the car near the museum steps, next to the church. While waiting for the rest of the boys to arrive, I tried a few angles with the fisheye. Only one really jumped out at me, a shot of the car from the front with groom and best man standing either side. There were a few other nice photos I took but the problem with the fisheye was the background. Every angle I tried I found contained too much unwanted clutter. First point to note with a fisheye - when positioning your subject look side-to-side and as far as the eye can see, because if you can see it, the fisheye will definitely get it in the frame.
Inside the church, you could get a quite different perspective with the fisheye. I took a few minutes looking around at what I could take and then asked the groom and best man to pose for a few. As with most churches, it was a bit dark so I had to open it up a bit but that's when a new problem arose. At f2.8, the lens isn't the best. On wide shots, I like to get everything sharp but the fisheye caused me a few problems. When you're at f8 and above, the fisheye is in its comfort zone and you can get everything in focus. The images come out very sharp, but open it up and the sharpness deteriorates, especially when you focus and recompose. Another point for me to put in my mental notebook. As I was not relying on the fisheye on this wedding, I could use a bit of trial and error, just as long as I got the safe shots in the bag with my usual lenses.
After the ceremony, when we got outside, and once I had a few candid photos of bride and groom greeting their guests, I could try a few shots. When the lens was stopped down a bit, it was back in its comfort zone. I got a nice one of the bridal party greeting their guests with the entire church tower in the frame. Not a competition winner, but a nice one for a background in the album. Once we were into the swing of the day, I didn't have much chance to get creative with the fisheye. I tried a few group shots with it, which came out OK - some images made the people on the ends look a bit too tall but it does give an extra element to the images giving you a different look. I also tried a shot of the bride and groom walking into the function room, getting most of the room in with them in the distance. Big mistake. I think the bride and groom took up about 20 pixels of the 10 million I had in the frame. Third point to remember - get your main subject a little closer to you than normal.
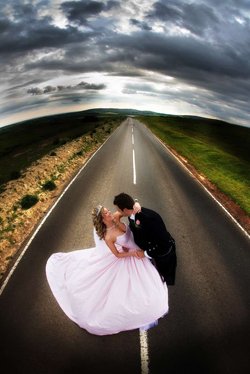
Over the next two weddings, I used pretty much the same tactics that I had used on the first - just using the fisheye when I could so that I could get a little wiser to its uses. One thing I did find with it was you have to be a little lower or a little higher to get a better perspective although, this did involve my co-photographer, Richard Walton, standing on the roof of my car to get a good angle of the bride and groom in the middle of the road.
If you are looking to get a different look to your images, the fisheye could be your answer. It really does make you think more about composition. Getting the subject and the rest of the scene right in the image can be a bit tricky but when it does come together, it gives your images a whole new dimension. It's also useful for making a group of drunken Welshmen at a wedding look good in the album. Having only used the lens on three weddings so far, I thought I would give you all some idea of what it was like for me being new to the fisheye. I'm going to be using the lens a lot more over the summer wedding season, in the hope I can get used to its qualities and create some winning images. I'm not sure I will ever master this lens, but I know I will have fun trying.
You are currently on page 1 Contact Jon Jenkins
1st Published 01/10/2008
last update 09/12/2022 14:54:18
More Weddings Articles
There are 0 days to get ready for The Society of Photographers Convention and Trade Show at The Novotel London West, Hammersmith ...
which starts on Wednesday 15th January 2025


