articles/Lighting/five-nature-page1
The Five Lights of Nature - part 1 of 1 2
by Jane Conner-ziser Published 01/10/2014

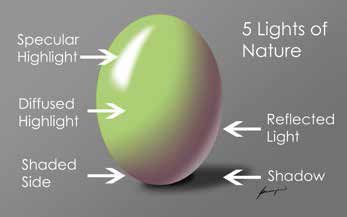
The Five Lights of Nature are values that artists and photographers use to create the illusion of depth and drama in two-dimensional output. Each of the five lights has characteristics that when combined, provide the viewer with information about shape, size, surface, colour and texture. The Five Lights of Nature always occur in the same relationship to each other. Portrait artists use light to create specific professional lighting patterns that accentuate the bone structure of individuals in the most flattering way. Shaping the light perfectly is the basis of professional portrait retouching. When more than one light source is used, more than one set of the five lights is produced so it's important to identify and understand what you are seeing when using light for photography, retouching and painting.
Light One / Specular Highlight
The specular highlight is the lightest value on an object. It tells you what direction the light is coming in from and how shiny or dull the surface of the object is. A shiny surface is represented by specular highlights that are very white in comparison to the neighbouring values and have sharp, well-defined edges ... like metal or catch lights in the eyes. A dull object, such as cotton fabric, is represented by specular highlights that are just a bit lighter in value than the next tonal value and it's hard to tell exactly where one ends and the other begins.

Light Two / Diffused Highlight
The diffused highlight contains the correct colour and truthful texture of the object. There is no difference in colour between the specular highlight and the diffused highlight, only a difference in value. The diffused highlight is the correct value for the object. This light shows you the correct skin tone and pore structure. While texture may be visible in other values on the object, the natural texture is evident in the diffused highlight value.
Light Three / Shaded Side
The shaded side finishes the lighting ratio and completes the trio of values that make rounded objects look round. The shaded side receives no light from the source light. There is a difference in both colour and value between the shaded side and the diffused highlight; the shaded side contains the complementary colour to the diffused highlight (an orange object will have a blue shaded side) and is darker than the object is in life. If there are blemishes or wrinkles on the skin, most of the roughness will show up in the transition between the diffused highlight and the shaded side - that's where good retouchers start blending and shaping the lighting.
HINT: if something looks too 'flat' - it's missing one of the previous lights. Determine what is missing and replace it.
You are currently on page 1 Contact Jane Conner-ziser
1st Published 01/10/2014
last update 09/12/2022 14:54:18
More Lighting Articles
There are 0 days to get ready for The Society of Photographers Convention and Trade Show at The Novotel London West, Hammersmith ...
which starts on Wednesday 15th January 2025


