


articles/Colour Management/future-proofing-your-colours-page1
Published
We all want to be able to show our images off to thebest effect and a key part of this is the need to have acolour correct screen to not only display our imagesbut also to retouch on if required. Whether you intendyour images to be viewed in print, online, on a curvedcinema TV or even 'in App' in this article Richard Westruns through the latest colour management tools andtechniques required for getting your colours correcttoday and tomorrow...
I'm sitting on a train, writing this article and trying to place images on an InDesign page that I can hardlysee, let alone get the colours right on. Now, whilst this is in no way the recommended way to work ina colour accurate environment (which would involve being in a darkened room and sitting square on tothe display amongst other elements) it is indicative of how most of us need and even like to work nowadaysi.e. mobile.
I present at a large number of photo, video and graphics shows every year and like me, the recurringfeedback I get from attendees at these events is that the days of the average photographer or videographerworking on a nice desktop machine in a controlledstudio environment are rare at best and a distant memoryor even never experienced fable for most. But heh this isprogress! I can now mock up designs and even managebasic retouching whilst on trains, planes, ferries and far toofrequently, in well know coffee shop chains (perhaps a colourmanaged printer next on the cutlery and napkins standwouldn't be such a bad idea Mr Nero??)
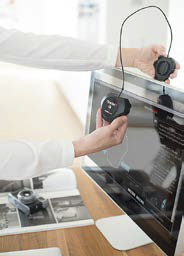
Taking this change in working practices into account theguys and girls of Datacolor's research departments havenow updated their range of Spyder screen calibration devicesto the latest version 5 model, incorporating as they doso, a major redesign to the physical unit to make it an idealmobile tool. Aside from sporting an upgraded sensor arrayfor even more accurate colour fidelity on screen the newSpyder5 comes built as a far more robust unit featuring thisarray encapsulated in a protective casing built to withstandthe knocks and bashes of the modern day photographer onthe move. There's even a new lens cap incorporated into thedesign to protect the optics when not in use. This also acts as thecounter balance on the USB cable for positioning the Spyder inthe correct place whilst calibrating the screen.
Following another trend to present our images and videos on larger TV screens and projectors, anotherredesign for the Spyder5 is the addition of a tripod mount to allow the device to be easily positioned for usein calibrating the bigger displays if the standard hanging of the device via its USB cable isn't possible. Theshape of the new Spyder has also been enhanced to optimise its usein calibrating the emerging array of curved displays from variousmanufacturers.
The Optics array itself is now upgraded to enable calibration of 4Kand 5K screens and features a new honeycomb filter to aid calibrationof lower quality displays susceptible to light scatter and leakswhich can seriously lower colour accuracy. Even the graphic designersstalwart, the beautifully designed Apple iMac can fall foulof these issues, as the thick glass front found on certain modelscan allow large amounts of light to creep into the display from itssides if not used in the aforementioned, classically recommended,colour controlled environment of a darkened studio. The honeycombfilter on the sensor, originally designed for the Spyder4 to alleviatethis problem, has now been further perfected to reduce any issues here.Consisting of a mesh of parallel tubes fixed at 90 degrees to the sensorarray, this honeycomb has now been made deeper and finer in its layoutto focus light more accurately onto the sensor array and hence further cut down stray light from falling onthe sensor. As such Datacolor are now seeing improvements of up to 55% in calibration compared to otherdevices, particularly on older or less colour accurate (expensive) displays. Perhaps this breathes new (calibrated)light into older kit for those of us trying to get longer life from our displays.
Calibrating a display with the Spyder is simplicity itself. Simply download and run the accompanying SpyderSoftware (Mac or Windows) on the relevant computer that is driving the screen to be calibrated. Once startedthis software runs a range of known colour swatches in front of the sensor array on the Spyder. The Spyderthen reads how these swatches are displayed by the screen and compares the readings with the software'slook-up tables to see what colour range the screen is capable of (i.e. its gamut or effectively its colour profile)and how far out from the ICC (International Colour Consortium) standard the display is. The ICC (A bodyconsisting of most computer hardware and software manufacturers)produced this standard allowing displays, printers and other colouroutputs to be measured against a uniform 'yardstick' of how coloursshould appear and corrected if not displaying correctly. Fortunatelywe don't have to understand the maths behind it, just run the SpyderCalibraion and as soon as you hit the 'Save' button at the end of theprocess, your display is corrected so you can now trust what you'reseeing.
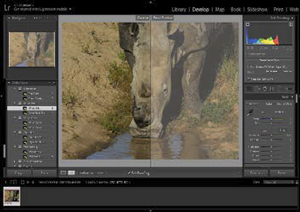
The only question remaining now is, "How will my images and videoslook on something else?" i.e. if you are wanting to print out yourstill images or display stills or video via a different medium (e.g. aprojector or TV), how can we check, and if needs be correct, how theywill appear? We are all probably aware that the same image in a glossymagazine can look vastly different in a poor quality newspaper, but howdo we get to see this and check the end result prior to output?Fortunately softwares such as Adobe Lightroom enable this with the greatest of ease. In Lightroom there isa large button in the Develop module. Once 'Ticked' if you have the relevant output profile for your intendedoutput (i.e. the ICC description file for what colours the printer or output device can produce) you cansimply apply this and 'Softproof 'the images for the relevant output.Once you can see how the imageswill appear on a particular outputyou can then make adjustmentsin the develop module tools palletto improve the image if needs be.Generic profiles for most printdevices, paper and other types ofoutput are widely available andsome even come with most operatingsystems.
Of course a vital prerequisite hereis to make sure that the screen youare softproofing on is calibratedinto the ICC standard otherwiseyou might be correcting a faultof the screen rather than the truerepresentation of what effect the output will have.
When it comes to softproofing your various outputs though, if using generic profiles for the different outputsaren't good enough for you - for instance if this is your living or you enter a lot of competitions, then youcan always creat your own output profiles for whatever you want to show your work on. If you are simplyshowing your images or video via a different display style device (e.g. a TV or Projector), you can always useyour Spyder5 to generatethe specific Profile foryour intended output.If you are going to printyou images though, wherea different type of paperor ink on the same printercan cause a major differencein appearance letalone if you have multipleprinters, then perhapsgetting the sister deviceto the Spyder5, the SpyderPRINTto calibrateyour different printersand papers would enableaccurate softproofing ofprint devices.
However important this last stage is to you, the key thing throughout is to get your images onto a calibratedscreen so go get a Spyder5 and show your true colours.
There are 0 days to get ready for The Society of Photographers Convention and Trade Show at The Novotel London West, Hammersmith ...
which starts on Wednesday 15th January 2025


SWPP - Society of Wedding and Portrait Photographers
The Society of Photographers
Clwyd Chambers, Clwyd Street, Rhyl, Denbighshire, LL18 3LA, UK
Tel 00 44 (0) 1745 356935
Home Page - Find a Photographer - Benefits of Membership - Events and Seminars - Who's who - Photographic Trade Directory - About - Qualification Structure - Mentor Me Programme - Professional Imagemaker Magazine Articles - FREE information pack - Privacy