


articles/Digital/goingupdown-page3
by Mike McNamee Published 01/10/2009
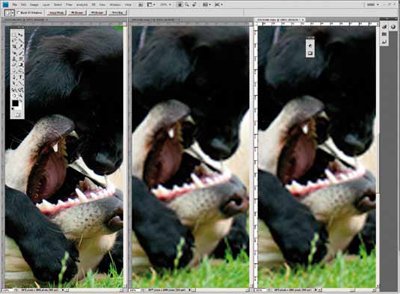
Scaling up and down is hugely damaging to a file regardless of how the scaling is incremented. The image on the left is the original, scaled at 50% increments in the centre and nominally 35% on the right. Both files to the right are damaged beyond use.
Testing
In order to test various scaling methods it is helpful to decide on some meaningful tests, ones that are reasonably typical. The most likely scale-up factor is between two and four times, representing a nominal 12x8inch RAW file moving up to a 16x24 or, at the extreme, to 48x32 inches. Scaling any larger than this requires quite specialised large-format printers and assuming you have to take the printing to a bureau, they are likely to have their own RIP scaling or even GF6 as standard.
Scaling down is most typically from about 3,900x2,600 to 1,024x768, a nominally three-fold reduction, for web use of image.
Taking a picture down even lower to say 800 pixels (quite common for web use) is a linear scaling of 4.88 times.
Much of the older theory on scaling calls for incremental scaling, that is, getting to a specific scale value in a number of jumps rather than a single move. Scaling down to a nominal 500 pixel image may be accomplished by scaling 3 times at 50% or twice at 35.36% to give the 8-fold linear reduction. We also scaled directly down to the 484 pixel size and then examined all the images. We could not tell the difference!
Scaling down, then up again, is very bad practice, it devastates image quality. We tried to move the files down 8-fold and the back up again using eight moves and six moves. The files were badly damaged but neither method was better than the other.
It is often recommended that scale down should be performed in very small increments eg using a 95% value as much as 10 times. This is sometimes accompanied by staged sharpening. Accordingly we wrote an action to carry the process out and did more testing. Although the image had an apparent higher sharpness over that reduced in a single move, the detail was rather coarse.
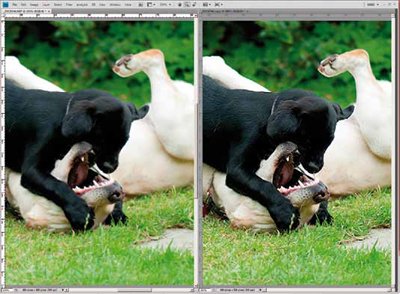
The file to the left has been scaled once down to size, that on the right has been scaled many times to the same eventual size using 5% reduction steps each time.
Comparing a more modest 50% size reduction using GF6 and Bicubic sharper (in Photoshop) revealed a detectable difference in the results. The GF6 was smoother but the Bicubic was sharper and produced more detail in the puppy hair along with more artefacting around the teeth.
GF6 rendered the grass more effectively.
Overall our conclusions were the same as those we have reached before. For stock submissions you are likely to be faced with a demand to use GF so you might as well get on with it. For really big poster enlargements GF6 gives a slight edge and the feeling that you are doing your very best. For more modest scaling Photoshop is more than adequate, particularly if you are prepared to experiment and use incremental scaling, we have seen some convincing demonstrations of the technique but it is probably image dependent.
There are 0 days to get ready for The Society of Photographers Convention and Trade Show at The Novotel London West, Hammersmith ...
which starts on Wednesday 15th January 2025


SWPP - Society of Wedding and Portrait Photographers
The Society of Photographers
Clwyd Chambers, Clwyd Street, Rhyl, Denbighshire, LL18 3LA, UK
Tel 00 44 (0) 1745 356935
Home Page - Find a Photographer - Benefits of Membership - Events and Seminars - Who's who - Photographic Trade Directory - About - Qualification Structure - Mentor Me Programme - Professional Imagemaker Magazine Articles - FREE information pack - Privacy