


articles/Lighting/lightingfordigital1-page3
by Dave Montizambert Published 01/01/2009
Having a flesh-tone in this test is not totally essential, however, it provides another real-life check - we are all very in tune with flesh-tones. In addition to my 'flesh-tone Sylvianne', I include a white blouse to give us another three-dimensional representation of a real-life white, and a black, woollen jacket, for a real-life black; both not unlike a bride's gown and a groom's black tuxedo.
When shooting with strobe or flash I often include a flash-meter in the shot, set to non-cord mode. This is not really necessary, however, it is a great way to confirm that each shot taken has received the correct amount of light, since strobe/flash heads can vary a little. Also I find that the meter is really handy to attach my small Macbeth Checker Card to with double-sided tape, and since this meter has a threaded hole on its back, I fasten it to the top of a pivoting head from a light stand or tripod; this makes it easy to get the best angle on the card (see Image 02).
By the way, all you really need for this test are three tones: white, mid-grey, and black. So if you don't have the budget for a grey-scale, then substitute the grey scale with white seamless paper, a grey-card, and a black jacket like a black tuxedo.
To set up lighting for this test set, I placed a softbox fairly close to the subject, but not so close that it makes it hard to keep even lighting across the subject and test targets (see Image 03). To keep things really simple I do not add a fill light, whether you do or not will not make any significant difference to the test results.
How the greyscale is angled is really important; it needs to be on such an angle that it is not picking up any glare from the main-light source. The question is, 'Where do you point the card?' The answer is, you need to aim it half way between the camera and the light source (see Image 04). Now if you want to impress your friends with how knowledgeable you are, refer to this as 'Cosine Compensation'. Placing the card half way between the camera and the light source is the optimum point. If I were to aim the card away from the camera a little and more toward the light, glare would appear on the card from the camera's view. If I were to aim the card away from the light source and more towards the camera, the more I pivot the card, the darker it will become. So, the half way point between is the perfect position for getting the maximum amount of light without glare; this ideal positioning is the same for grey-cards as it is for grey-scales.
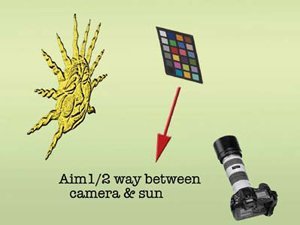
And so that is the set-up. This test can also be done outdoors, just think, 'What is my light-source' and set up accordingly - aim the greyscale card halfway between the lens and the sun (see Image 05 & 06). The next article will continue with our Shirley test.
There are 0 days to get ready for The Society of Photographers Convention and Trade Show at The Novotel London West, Hammersmith ...
which starts on Wednesday 15th January 2025


SWPP - Society of Wedding and Portrait Photographers
The Society of Photographers
Clwyd Chambers, Clwyd Street, Rhyl, Denbighshire, LL18 3LA, UK
Tel 00 44 (0) 1745 356935
Home Page - Find a Photographer - Benefits of Membership - Events and Seminars - Who's who - Photographic Trade Directory - About - Qualification Structure - Mentor Me Programme - Professional Imagemaker Magazine Articles - FREE information pack - Privacy