articles/Lighting/lightingfordigital17-page2
Lighting for Digital part 17 - part 2 of 1 2 3 4
by Dave Montizambert Published 01/10/2010

Lighting offers some control, we can alter how dark the flesh looks using exposure either by altering light source intensity and/or with camera exposure settings, and we can 'warm-up' or 'cool-down' skin-tone colour using gels over lights and/or filters over lenses. Back in the days before digital capture, my choice of film offered some additional control (some films did a better job of rendering flesh than others), but for the most part I had to rely on a good make-up artist for really fine control over flesh, especially if we were striving for something other than reality like a summer tan in winter time.
(Nowadays I rely on make-up less since I have incredible retouching capabilities in post). At any rate, once captured on film, part of that responsibility for the 'perfect' flesh-tone was passed on to a lab technician to process and print, and if for press, then it was the service bureau or prepress house and press operator who shared that responsibility with the photographer. Beyond make-up and lighting, we have some really powerful tools in post-production applications like Lightroom (LR), Adobe Camera Raw (ACR), and Photoshop, for tweaking and altering skin-tones in our digital files. That extra control comes at a price, you need to understand colour much better than you did as a film photographer - you are solely responsible for image colour and skin-tones in the digital file and at least partially responsible in the final output.
If you find this prospect of being responsible for something scary, fear not, I can give you the confidence in skin-tones you crave with a very simply technique that I use for tweaking flesh that doesn't require you to become a mathematician or a colour scientist.
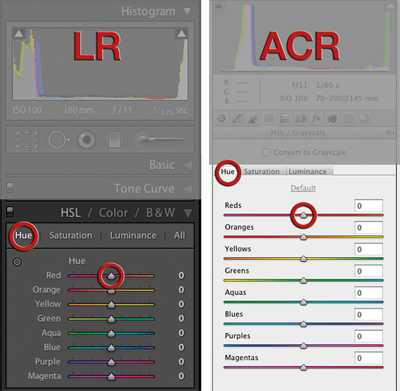
In ACR and in LR we have the HSL sliders which are really powerful for tweaking or correcting skin-tones or any other colour/tone for that matter, such as blue skies, or green foliage. The beauty of this HSL system is selectivity, it breaks colour down into three components, Hue, Saturation, and Luminance and it allows you to affect these three on just one separate range of colour such as Red for flesh. For instance, dragging the Red slider with Hue selected (see Image 002) will push the colour of only the selected image's predominant red tones, like skin-tones, around the colour wheel.
The system works like this:
Hue selected: dragging the Red slider to your right pushes flesh towards yellowish red, dragging to your left moves flesh towards blueish red.
Saturation selected: dragging the Red slider to your right will intensify the predominant red tones, dragging to your left will desaturate.
Luminance selected: dragging the Red slider to your right will lighten the predominant red tones and to your left will darken.
Obviously selecting and dragging the other colour range sliders like yellow or green will do the same to those colours as did the red slider.
Please Note:
There is more than one page for this Article.
You are currently on page 2
- Lighting for Digital part 17 page 1
- Lighting for Digital part 17 page 2
- Lighting for Digital part 17 page 3
- Lighting for Digital part 17 page 4
1st Published 01/10/2010
last update 09/12/2022 14:55:47
More Lighting Articles
There are 0 days to get ready for The Society of Photographers Convention and Trade Show at The Novotel London West, Hammersmith ...
which starts on Wednesday 15th January 2025


