


articles/Lighting/lightingfordigitalpart15-page2
by Dave Montizambert Published 01/06/2010
Fast Blend Mode Knockout recipe for light background
scenes:
• Open the subject image.
• Double click background layer and rename it to make it a true layer.
• Open the backdrop image.
• Hold down the shift key as you click and drag the background layer from backdrop image fi le into the open window of the subject image file.
• Drag the backdrop image layer to the bottom of the layer stack so that is sits underneath the subject image layer.
• Select the subject layer and then duplicate it, Layer > Duplicate Layer > OK or use keystroke short cut - Cmd/Ctrl J.
• Hide this new layer's visibility by clicking on its visibility eyeball icon.
• Select the middle layer (the original subject layer).
• Switch the layer blend mode from its default setting of "Normal" to "Darken (located near the top of the Layer palette)," in some instances "Multiply" may work better.
• Select the top subject layer and turn its visibility back on.
• Create a Hide All (Black) Layer Mask - Layer > Layer Mask > Hide All for this top layer.
• From the tool palette select the brush tool.
• Near the bottom of the tool palette set foreground colour to white then paint over image where subject is ghosted (where the background shows through), make sure that the layer mask thumbnail on the subject layer is selected before you start painting.
• If you make a mistake painting on the layer mask, select black as the foreground colour and paint over this area to correct it.
• If the rest of the body is hidden or partially hidden, you can paint white over the layer mask to reveal it, or instead of painting you can create selections using 'colour range', or the pen or lasso tool and then fill these selections on the black hide-all layer mask with white.
• For problem areas you can cheat a little by using the dodge or burn tool to lighten or darken parts of the bottom layer, make sure you use a a low opacity and/or pressure with soft edged brush to gradate the edges of that tone change.
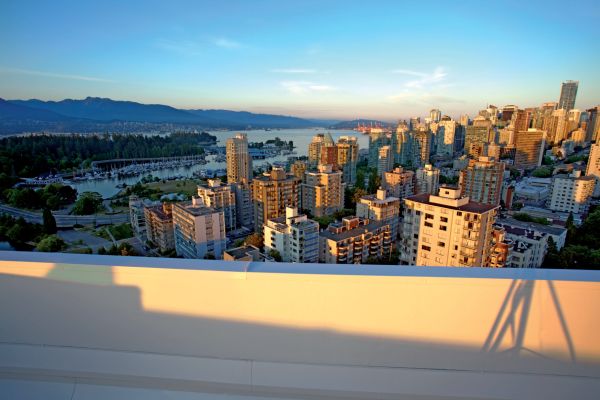
Matching the white balance (WB) between the two images so that they looked like they belonged together went as follows: to preserve the warm WB of the setting sun, I set the camera's WB to daylight and then matched this on Michael, whose portrait I shot at 5000K for a perfect neutral WB with studio strobes, by using a Photo Filter adjustment layer in Photoshop. The Photo Filter method made more sense than trying to set the WB in camera or after the fact with Raw processing - doing it in camera or during image processing would mean guessing how much warmth was good, whereas using a Photo Filter adjustment layer on just Michael's layer once the two images were compo sited allowed me to see how well the two would match. In addition to this, since the Photo Filter is on an adjustment layer, as long as I save the composite as a layered file I can change my mind at any time and tweak it further.
A couple of other touches in Photoshop that helped the composite look a little more real were: a radius of 1.7 pixels was set in the Gaussian Blur filter dialogue box for just the cityscape layer and 2% was set in the Noise>Add Noise filter, along with the Uniform and Monochromatic boxes selected to prevent banding occurring through the soft gradations caused by this blur. The slight blurring of the cityscape makes it appear a little out of focus so that more attention is placed on Michael.
There are 0 days to get ready for The Society of Photographers Convention and Trade Show at The Novotel London West, Hammersmith ...
which starts on Wednesday 15th January 2025


SWPP - Society of Wedding and Portrait Photographers
The Society of Photographers
Clwyd Chambers, Clwyd Street, Rhyl, Denbighshire, LL18 3LA, UK
Tel 00 44 (0) 1745 356935
Home Page - Find a Photographer - Benefits of Membership - Events and Seminars - Who's who - Photographic Trade Directory - About - Qualification Structure - Mentor Me Programme - Professional Imagemaker Magazine Articles - FREE information pack - Privacy