articles/Lighting/lightingfordigitalpart16-page2
Lighting for digital Part 16 - part 2 of 1 2 3
by Dave Montizambert Published 01/08/2010

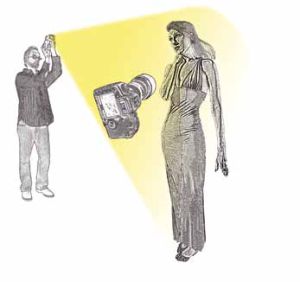
Unfortunately, and I will use that word a lot in this story, after taking the first reading, the read-out on the meter sputtered in and out of existence a couple of times as the poor thing's life flashed before its eyes and then went blank - death by dead battery was the prognosis. We did have spare meters and batteries, but unfortunately they were back at the parking lot with the rest of the gear. Since we were shooting digitally we could rely on the LCD preview image on the back of the camera, but judging exposure and lighting ratios solely by screen previews without meter readings to back it up is less than optimum since our eyes are influenced by the surrounding environment's brightness which affect critical visual judgement of preview screens. Accurate exposure is really critical in an image with high-contrast subject matter and subtle shadow detail like Image [1]. In my opinion, using the histogram to judge exposure in an image like this one, isn't so hot either - it is too interpretive and it tells you nothing about lighting ratios. You could argue that exposure could be corrected during processing , which it could, but if you needed to brighten the exposure this would surely create banding issues in the shadows since digital cameras do not assign much bit-depth to dark tones. This whole situation seemed like the perfect time to freak-out but for some reason I just let go, maybe the laid back vibe of islands got through to my frenzied mainlander brain, or more likely too many things had gone wrong and my brain said, "Enough!" and let go. Anyhow I completely relaxed, cleared my mind, and a few short moments later a solution popped into my mind; some time ago while teaching a group of photo students about strobe/ flash lighting, I came up with a metering solution for those who couldn't afford flash meters.

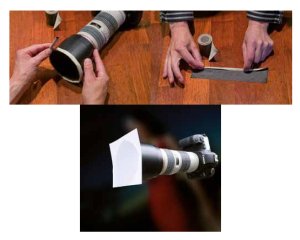
This temporary solution turned your digital SLR into an incident flash meter without using the in-camera meter at all! Acting on this memory, a homemade 'filter holder,' made of rolled, duct tape with sticky side out (see Image [3]), was wrapped around the front of the lens (see Image [4]). With the tape in place, a blank sheet of clean white paper, torn from a notebook which always resides in mycamera bag, was stuck to this 'filter holder' completely covering the front of the lens with clean, blank, unwrinkled white paper (see Image [5]). With the camera held next to Sherri and with the white paper end of this impromptu meter pointed at Rick's speed-light (see Image [6]), several exposures were taken. With each exposure Rick varied the flash output with its manual output settings creating a series of captures that look like solid grey swatches ranging from brighter to darker. "Looking in turn at each image's histogram on the back of the camera, I chose the image whose histogram spiked in the centre at middle grey. This method works only if the paper is the same density as the paint on a middle-grey card, see callout box entitled 'Grey Card Incident Meter Explanation.' After identifying the best exposure from the histogram, Rick reset the speed-light to the manual power setting which created that exposure, I removed the white paper from the lens, and with the help of a flashlight aimed at Sherri's silhouetted face, auto-focused, and then captured a series of images of Sherri such as Image.
Please Note:
There is more than one page for this Article.
You are currently on page 2
- Lighting for digital Part 16 page 1
- Lighting for digital Part 16 page 2
- Lighting for digital Part 16 page 3
1st Published 01/08/2010
last update 09/12/2022 14:55:51
More Lighting Articles
There are 0 days to get ready for The Society of Photographers Convention and Trade Show at The Novotel London West, Hammersmith ...
which starts on Wednesday 15th January 2025


