


articles/Lens/marvellousmacro-page3
by Mike McNamee Published 01/04/2007
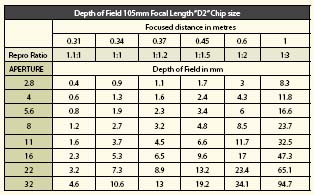
Depth of Field
Digital has improved many aspects of macro photography, especially the gauging of correct exposure which always involved either calculations or the use of tables or nomograms (oh happy days!). This used to be compounded by the problem that the lens was electronically isolated from the body so that the exposure meter did not function. Nowadays you simply look at the histogram after exposure and you know, very precisely, how to adjust you exposure as it is a WYSIWYG system. Depth of field though has become a little more confusing, not less. You used to be able to rely on little booklets, that came with the lens, to look up the depth of field. However, the different chip sizes and formats mean that these tables no longer apply unless you have a full-frame SLR. We can at least provide you with tables for the classical 35mm frame size and the Nikon D size of chip (23x15mm). This gets you into the right ballpark at least. We have assumed a circle of confusion of 0.016mm, arrived at by backcalculating from 5x4in, through 6x6cm and 35mm formats to the D-size chip. Probably not a perfect calculation but close for most applications outside of an optical laboratory.
You can see from the values in the table that the depth of field values are very small. For example at 1:1 and f2.8 it is a mere 0.3mm, the thickness of a fingernail. This brings along a host of other problems when trying to focus upon a subject.
Focus
As macro distances are approached, the usual rule of focusing 1/3 distance into the subject (or group at a wedding say), breaks down, so that by the time you get to 1:1, the optimum distance is half way into the subject; that is the depth of field is equally disposed to front and rear of the focus plane. From a composition point of view, however, the usual rules still apply, namely that big splodges of out-offocus foreground are very distracting. Selection of the focal plane therefore is critical and often not best served by auto focus. A better approach is to decide on the magnification required and then to manually set the 'focus' to that point using the lens barrel markings, then to approach the subject until the correct zone becomes sharp and shoot. The focusassist light in your viewfinder is a boon if your eyesight is not top-rate (over 55? - forget it!) but for those with good vision, a plain ground glass screen is best (for youngsters - our old cameras allowed you to change the screens).
For field macro (eg insects) the problem of body movement is acute, the natural rhythmical movements of the body due to heartbeat, breathing and muscle twitching all play their part in destroying image sharpness. In the field, tripods and monopods make life very difficult, frightening shy insects and slowing things down. The only answer is to use flash (of short duration) combined with the highest synchronisation speed you have available. If you do not take care, even a 1/250 synch speed will be too slow. The problems of poor focus due to body-rhythm movement and to camera shake are different. Poor focus leaves you sharp, but in the wrong place, camera shake leaves you with images that are fuzzy, especially in insect wing details and the like.
There are 0 days to get ready for The Society of Photographers Convention and Trade Show at The Novotel London West, Hammersmith ...
which starts on Wednesday 15th January 2025


SWPP - Society of Wedding and Portrait Photographers
The Society of Photographers
Clwyd Chambers, Clwyd Street, Rhyl, Denbighshire, LL18 3LA, UK
Tel 00 44 (0) 1745 356935
Home Page - Find a Photographer - Benefits of Membership - Events and Seminars - Who's who - Photographic Trade Directory - About - Qualification Structure - Mentor Me Programme - Professional Imagemaker Magazine Articles - FREE information pack - Privacy