


articles/Photoshop/p1background-page2
by Mike McNamee Published 01/04/2005
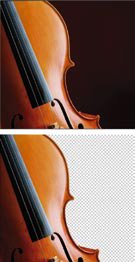
EASY: Magic Wand on the black portion then Edit>Clear on a layer. Any background may now be applied.
Conceptualisation
Sometimes the conceptual brief will be provided by an art director, especially if it includes advertising copy and a desire to get a specific message across. At the other end of the scale is the pressing need to composite an open eye across a closed one so you can get the album off the Graphi in tonight's post! The former is a self-starting process for which you might go off and take specific images; the latter is a necessity driven by a need to repair a shot.
In terms of creative satisfaction the first scores highly and time will drift rapidly by, the second may simply pay the bills or retrieve your reputation but has to be done.Planning
Always plan, even if the task is trivial. Always check that you are tackling the task in the simplest, most efficient way. Once you have decided on a course of action take a final look over your shoulder before you charge off - for example there may be a better unblinking eye you flagged out in the file browser for another reason!
For major productions make a sketch and use it to trigger potential problem areas. For example, the front of the lifeboat would have been easier to cut out if it had been shot against a bland background (the chosen view was deliberate to challenge and test the students!). In addition it was necessary to extend the safety rails on the right so that they reached the bottom of the shot. We knew that would be simple but even with the widest lens available (12mm) we could not get enough of the deckhouse in by the time we canted the image over. In retrospect we should have tilted the lens and arranged both the side and the bottom of the view to coincide with the proposed frame edges. This exposed a slight lack of planning ahead of the shoot; the notion of tilting the boat was developed at the initial trial compositing stage.
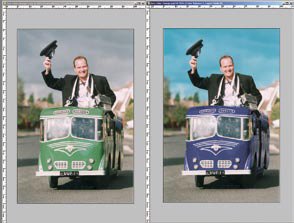
MODERATE: Magic Wand on the sky, followed by refinement of a Quick Mask. The bus was masked with a combination of paths and brushed mask features, including gradients on the mask.
Other problems were beyond the reach of any planning. We looked up the tide tables for a big tide around the middle of the day. The force eight nor' westerly gale was a bonus. However the lighthouse had sprouted a protest banner, which rather spoiled the isolated look we were after, and we had to go back to a legacy image and "mend" the rim of the lamp house. This required some tricky masking and colour adjustment.
Practice the Parts
It pays to practice your technique before launching into the task. Here are examples from the illustration heading this feature.
We knew that we wanted to tilt the horizon to add to the drama, but this needed additional space around the image to allow for cropping. Secondly, we did a rough path to cut out the background for the lifeboat so we could check the perspective and scale before spending time refining the paths and the mask. Thirdly, we practiced the methods for "wrapping" the bow wave breaking over the front of the boat. We soon realised that we needed to either work on a duplicate so we could back track if we messed up adjusting the mask. Alternatively we decided to "clear" the background by applying the mask and then adding another one to blend the wave over the area. We also established at this experimental stage that a blurring of 1 pixel was required to the hard-edged mask.
The beam from the lighthouse was initially drawn out using the Pan Tool to create a path, the shape of the light. The area within this path was duplicated onto a new layer (Ctrl-J). Different layer modes were tried and also a Curves Adjustment Layer was added. To simulate the gradual diffusion of the beam, the edges were softened using Gaussian Blur and then the whole beam was diffused using a gradient on the mask of the adjustment layer. Having confirmed the method this was applied to the final image with the additional flourish of lighting the panes of the lamp house as well. After some discussion with the students we elected for a single beam of light as being more realistic than a beam going in two directions.
There are 0 days to get ready for The Society of Photographers Convention and Trade Show at The Novotel London West, Hammersmith ...
which starts on Wednesday 15th January 2025


SWPP - Society of Wedding and Portrait Photographers
The Society of Photographers
Clwyd Chambers, Clwyd Street, Rhyl, Denbighshire, LL18 3LA, UK
Tel 00 44 (0) 1745 356935
Home Page - Find a Photographer - Benefits of Membership - Events and Seminars - Who's who - Photographic Trade Directory - About - Qualification Structure - Mentor Me Programme - Professional Imagemaker Magazine Articles - FREE information pack - Privacy