


articles/Lighting/part35-page4
by Dave Montizambert Published 02/02/2015
7
Now Frequency Separation is set and ready to be brushed over the subject to smooth and tone the skin reducing roughness, making wrinkles less dark and less noticeable, plus toning down 'glare' areas. Here's how I like to do it:
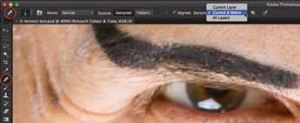
-Select the 'Retouch Colour & Tone' layer then brush over wrinkles and blotches with the Healing Brush tool, or the Clone Stamp tool. Make sure to set the 'Sample:' field in the Tools' Option Bar at the top of the open window to 'Current & Below' so as to not select any pixel information from the top layer (see Image_07).
-Select the 'Detail and Texture' layer to remove unwanted sharp detail like blackheads and rough skin texture, or use this layer to seamlessly clone detail back into burned out areas, using the Clone Stamp Tool set to 100% Opacity and Flow. If you haven't done it yet, be sure to set the 'Sample:' field in the Tools' Option Bar at the top of the open window to 'Current Layer'.
Now I hope the recipe above didn't make your head ache trying to follow it, I know I got lost several times while proof-reading the above and I wrote it! The problem here is trying to learn visual concepts from written word, actually seeing it demonstrated first hand or better still in a video, which you can play it over and over again, makes comprehension so much easier. To avoid 'Frequency Separation Frustration', I suggest that you apply the steps of this recipe to an image while reading it, this will make it much easier to understand, and I also suggest that you should record the first 18 steps listed above as a Photoshop Action so you never ever have to do them ever ever again!
To make learning Frequency Separation and general facial retouching much easier and to delve more deeply into the subject than space for this article allows, I have created a DVD tutorial called High-Speed Facial Retouching (see Image_01) available now at www.montizambert.com. This absolutely incredible :) set of retouching video tutorials, shows you in painstaking detail, everything you need to master Frequency Separation including how to use it with 8-bit images as well as 16-bit images. This DVD also includes a ready-to-go Photoshop Action for Frequency Separation retouching and has not one but two versions: one for 8-bit images and one for 16-bit images (I use different 'Apply Image' settings when working with 16-bit files). The great thing about the Action is you open an image, run the Action, decide what areas of your image need retouching help, select which layer (the Colour and Tone or the Detail and Texture layer) best suits that retouching situation, decide whether to start with the Healing Brush Tool, or the Clone Stamp Tool, then brush over the afflicted areas, and a short while later you are on the beach sipping mai tai's with all the time you have saved.
There are 0 days to get ready for The Society of Photographers Convention and Trade Show at The Novotel London West, Hammersmith ...
which starts on Wednesday 15th January 2025


SWPP - Society of Wedding and Portrait Photographers
The Society of Photographers
Clwyd Chambers, Clwyd Street, Rhyl, Denbighshire, LL18 3LA, UK
Tel 00 44 (0) 1745 356935
Home Page - Find a Photographer - Benefits of Membership - Events and Seminars - Who's who - Photographic Trade Directory - About - Qualification Structure - Mentor Me Programme - Professional Imagemaker Magazine Articles - FREE information pack - Privacy