


articles/Photoshop/photoshopluminous-page1
by Mike McNamee Published 01/09/2006
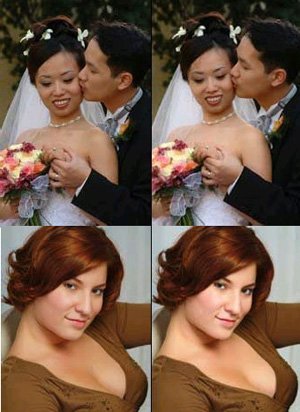
Digital photography is so critical on exposure that we don't want to overexpose skin, yet we want the luminosity and glow of transparent light. Here's a beautiful technique to brighten up the highlights of your image and give their skin a luminous quality. It will essentially enhance the light ratio, increase drama and create beautiful skin! This wonderful effect is so useful, that I have an action recorded on a function key and use it regularly! The technique does have many steps, so making an action is the most practical way to apply it. I have also found it to yield consistent results with the settings described below.
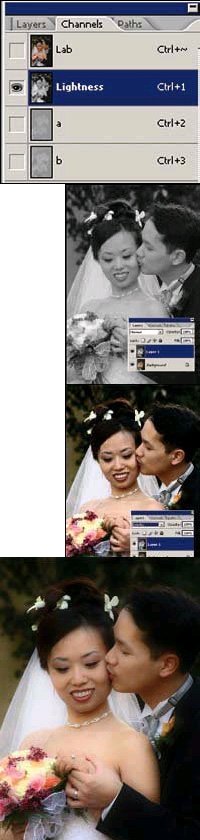
Step 1: Convert your image to Lab Colour mode. (Layer>Mode>Lab Colour)
Step 2: Click on the channels palette to view and click on the lightness channel to see the black and white values of the image.
Step 3: Select all (CTRL+ A for PC, or CMD+A for mac), then copy (CTRL/ CMD+C)
Step 4: View the layers palette again and make a blank layer above your image layer.
Step 5: Paste the B&W version on that layer (CTRL/CMD+V)
Step 6: Put the layer mode in Overlay (on the layer palette below the layer tab). This will increase the contrast dramatically, blocking up the black areas.
Step 7: Blur the layer: Filter>Blur>Gaussian Blur>20px (approx)
There are 0 days to get ready for The Society of Photographers Convention and Trade Show at The Novotel London West, Hammersmith ...
which starts on Wednesday 15th January 2025


SWPP - Society of Wedding and Portrait Photographers
The Society of Photographers
Clwyd Chambers, Clwyd Street, Rhyl, Denbighshire, LL18 3LA, UK
Tel 00 44 (0) 1745 356935
Home Page - Find a Photographer - Benefits of Membership - Events and Seminars - Who's who - Photographic Trade Directory - About - Qualification Structure - Mentor Me Programme - Professional Imagemaker Magazine Articles - FREE information pack - Privacy