articles/Postproduction/portraitretouchingtools-page1
Portrait Retouching - Photoshop Tools and Options - part 1 of 1 2
by Jane Conner-ziser Published 01/08/2011

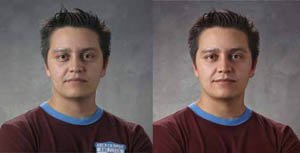
Real retouching requires mastery of a variety of Photoshop tools in order to create the best possible results in the minimum amount of time. It's been my experience when training large groups of artists, (such as at colour labs), that most of the artists are very good and can create artwork that looks very similar in finished result BUT one artist may work on an image for two hours and another artist could do the job in 20 minutes. The difference? The plan for the job, the tools selected and the speed in which the artist works.
On most faces you will find that one tool will get you started and another will finish the job quickly. Here's the ones that I use along with the options I most often use for them:
Spot Healing Brush: Normal Mode, Proximity Match, Sample All Layers is checked. Create a new layer on which to apply the spot healing. Use it to remove small spots like flecks of make-up, stray whiskers or 'dust' spots. The technique is simple; just colour over the spot you wish to remove, but only cover what needs to be covered. Be delicate! The layer is usually used at 100% opacity and is merged onto the background copy upon completion of the task.
Healing Brush: Normal Mode, Sampled, Aligned is not checked, Sample All Layers is selected. Create a new layer upon which to apply the healing brush. Use it to minimise the contrast in highly textured areas such as multiple crinkles around the eyes, frown lines, neck lines and very deep smile lines. Select a source with smooth skin texture (Option or Alt tap) and apply light strokes over the textured area until it is smooth. Reduce opacity to taste (about 30-50% generally) and merge onto the background copy. Finish the job with the Dodge and Burn tools and the Brush tool if needed.
Patch Tool: On most images, use the option of Source to remove definite spots such as blemishes and unwanted moles. It's also good for cleaning up backgrounds (removing electric wall sockets, etc) and repairing clothing. Use it directly on the background copy unless you feel insecure and, in that case, duplicate the background copy for the technique. The technique is to use the tool to circle the spot you wish to remove, then drag the selection over an area that contains the texture you would prefer. Photoshop will match the colour and value for you. If you are working on a face with few unblemished areas, change the option from Source to Destination. With this setting, circle a smooth area of skin, then drag and drop it repeatedly over the spots you wish to remove. The work from the patch tool is also usually finished with the Dodge and Burn tools. (If you have made a duplicate of the background copy to apply the patch tool to, merge it onto the background copy upon completion of the work.)
Brush Tool: The Brush tool is very versatile for retouching! It is used to re tint small discolourations caused by extensive dodging and burning, correct unpleasant skin tones, fix make-up, fill in hair, correct teeth, add vignettes and enhance eyes. It will be used in a multitude of sizes and styles, with a variety of options and blending modes so make sure you get a lot of practice with it! Paint on a layer whenever possible so you can adjust opacity, erase, apply layer masks, and change blending modes - tip - each colour, or each step of the work gets it's own layer. When the work is completed with this tool it is common to group the layers from a single task, like enhancing eyes, then merge everything onto the background copy when the entire job has been completed.
You are currently on page 1
- Portrait Retouching - Photoshop Tools and Options page 1
- Portrait Retouching - Photoshop Tools and Options page 2
1st Published 01/08/2011
last update 09/12/2022 14:58:04
More Postproduction Articles
There are 0 days to get ready for The Society of Photographers Convention and Trade Show at The Novotel London West, Hammersmith ...
which starts on Wednesday 15th January 2025


