


articles/Photoshop/selectivefocus-page1
by Dave Simm Published 01/12/2001
One of the first things I noticed about my wonderful little Olympus E10 and subsequently the E-20N, which I so thoroughly enjoy using, was that the incredibly short focal length lenses have such enormous depth of field that it is often much more than would be desirable.
Most portrait photographers like to use a longer lens to control perspective and soften the background somewhat, fashion photographers will use extreme tele lenses to throw the background completely out of focus. A luxury that those of us who have gone digital were beginning to learn to live without. It just doesn't have to be that way, however, when you use image manipulation software as you almost have to do to "process" your digital images there are ways to achieve almost any effect you want, including a fuzzy background. I picked this interesting little technique from an article by Robb Kerr in the inaugural edition of a brand new America Magazine called Digital Capture. For anyone starting in digital imaging it is a fascinating journal I highly recommend you can find more about it at http://www.digitalcapture.net drop them an e-mail and tell them I told you about it.
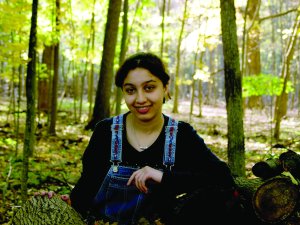
Although there are many photo editing programmes on the market today, will assume you use Photoshop 6 for your image manipulations, as I did with this picture of my daughter Hala. This image was one of the first test shots with a pre-production model of the Olympus E-20N, captured onto an IBM one gigabyte Microdrive, using programmed everything, I just let the camera do it's stuff.
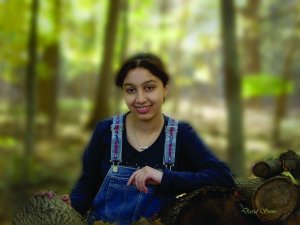
I rather liked the shot of Hala, but found the backdrop of my log pile and the forest preserve behind our home just a little overpowering, I happened to be playing around with this shot when this edition of "Digital Capture" arrived in my mail box. Be aware that you are looking at my first attempt with this technique, not that I'm embarrassed by it, I mention it only as a testimony to the author who made it so easy for me to succeed and I will try to show you how, without plagering his fine article.
First, if you are not familiar with the opening screen in Photoshop you should get to know the tools that are positioned around the perimeter. Down in the bottom right hand corner is the layers palette, this are will be playing a key role in this manipulation. So open up an image where you would like to isolate the subject from the background.
Now as you look down to the palettes layer you will see that a thumbnail of you image has been created there. At the bottom of the layers palette is a tool bar and the second box to the right contains the new layer icon. Click onto the thumbnail and drag it down to the new layer icon, you will new see a second thumbnail appear, called background copy, repeat the process to create background layer 2.
Having managed that, we now have to make the top layer active, do that by clicking on it's thumbnail, and you will see a little paintbrush icon appear to the left of it. Now for the hard part, select your subject by whatever method you normally use, in my example I used the magnetic lasso, although I don't suppose I would use that method every time, as I mentioned this was a first. I did not cut around the logs that were is the same plane as my daughter.
With the top layer still active, go the tool bar at the bottom of the layer palette and click add a layer mask, ( if you leave your curser over each of the icons for a second or two Photoshop will pop up a label with their names), now if the two layers beneath the layer mask are turned off, your subject should be isolated against a grey and white checkerboard.
To all intent and purpose, the background layer is now invisible, or masked, presenting you with the opportunity to clean up any messy pixels there might be around the subject. Also if you want to hide more background you could target the layer mask, by clicking the layer mask thumbnail, and paint out with black.
If you're like me, you're probably in a state of delirium with all this success, but let's keep going we're almost at the end, now tread easily we don't want to get carried away and goof it up, so close to completion, those of your who know me, know just how easy that is. Now let us target the middle layer, the one directly below the layer mask, go to filters Gaussian Blur and select the number of pixels that will give the preferred result, watching the screen image as you run the slider back and forth.
Ooh, isn't that nice, but there is still some degree refining that you can exert, for instance if the edge effect between you subject and the background have an uneasy looking interface, you might want to graduate the blur. To do this, add a layer mask to the blurred layer, setting the foreground and background colour to the default black and white, the D key will do this in one stroke.
Open the gradient tool and select the first preselect in the drop down menu marked Foreground to Background Gradient, you may notice I did not complete this step, now with the blurry layer's layer mask targeted, drag the gradient tool from where the background should be sharpest to the point where it should be fuzziest.
How much digital manipulation you apply to your work has to be dependant on one or two criteria, if you are creating the image for show, competition or judging panel, or how much you are going to earn from the work you do. Kentucky Fried pictures sold at the lower end of the fee scale will clearly qualify for a lot less time and effort in refining the image than a canvas masterpiece that you intend to charge a substantial fee for, or perhaps, an image to submit for your qualification panel.
I enjoyed this technique immensely, and no doubt will use it often, when I can't throw the backdrop out of focus, even at f2.2 as was the case here. Not that I need justification for going digital, the more I shoot with the Olympus E10 and E-20N and the more I dabble with imaging software, the more I wish they had all arrived on the scene at the beginning of my career, now the only thing I am scared of is having to work till I'm ninety so
There are 0 days to get ready for The Society of Photographers Convention and Trade Show at The Novotel London West, Hammersmith ...
which starts on Wednesday 15th January 2025


SWPP - Society of Wedding and Portrait Photographers
The Society of Photographers
Clwyd Chambers, Clwyd Street, Rhyl, Denbighshire, LL18 3LA, UK
Tel 00 44 (0) 1745 356935
Home Page - Find a Photographer - Benefits of Membership - Events and Seminars - Who's who - Photographic Trade Directory - About - Qualification Structure - Mentor Me Programme - Professional Imagemaker Magazine Articles - FREE information pack - Privacy