articles/Digital/sharperimage-page1
The Sharper Image - part 1 of 1
by Terry Hansen Published 01/11/2005

Terry Hansen looks at technique for Quality Matters
Are you looking for a sharper image? It is quite possible that your camera is capable of producing much sharper pictures than you think. One recurring problem I see, as Chairman of Qualifications, is pictures that are just unsharp. Often this is because the photographer does not understand that digital pictures are inherently unsharp and have to be sharpened at some stage of the workflow.
Sharpening in Photoshop has been the subject of many articles in the past, everyone has their favourite method. Over the years an almost standard method has evolved and this is the recognised procedure. First change your image to Lab, go to Image > Mode > Lab colour, open Channels, turn off all channels except lightness, go to Filter > Sharpen > Unsharp mask set the amount to 75% radius, 1 pixel, threshold 0 then click OK. Now go back to Image > Mode > RGB and save the image as normal. This works pretty well in most situations.
However, what if you need to enlarge or reduce the size of your image? Firstly, I will explain my usual method of workflow. I am a great believer in shooting in RAW. I open my files in Photoshop's CS Raw converter, or now I have upgraded to Photoshop CS2, I use Camera Raw converter from within Bridge. I make any adjustments needed and then apply sharpening by going to Detail > Sharpness and moving the slider to 50. Sharpening by this method is better because Camera Raw is working in a linear space while Photoshop works in a gamma space. This, I am told by the experts, sharpens the image without generating artefacts. I then convert my images to JPEG by using Dr Russell Brown's Image Processor in CS, a script that is now included in CS2 under Tools > Photoshop > Image Processor. I now crop my image to 10 x 8 inches and save. I then use Image > Image Size > and change Document size to 5 x 4, 20 x 16 or 20 x 24 inches using Bicubic interpolation. This has worked fairly well for me, but as ever with digital, the hardware and software is improved and updated and a better method is now available.

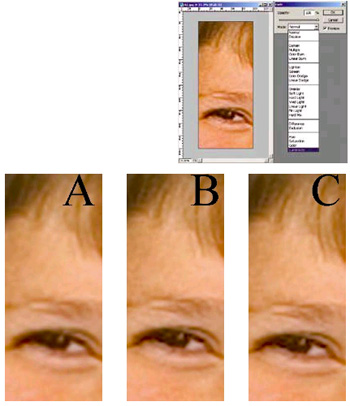
After sizing to our preferred size, say 10 x 8 inches, if we want to go larger we can use Bicubic or Bicubic Smoother. If downsizing, try Bicubic Sharper. However a better method is using Camera Raw to alter the size of the processed raw image to approximately the required, finished size. Let me explain. A Nikon D70 camera produces a file that measures 3008 x 2000 pixels which translates to 15.04 x 10 inches at 200ppi or 6MP. In Camera Raw we can upsize our image in steps right up to 4085 x 6144 pixels, which translates to 20.425 x 30.72 inches or 25.1 MP. What does this mean in practice? Look at the set of pictures. Picture A sharpened in Raw but not resized, converted to JPEG and cropped to 10 x 8 inches. A2 is the same image upsized to 250% using Bicubic Smoother to give us an image of 20 x 25 (close to our required size of 20 x 24 inches) and then cropped to show the eye of the boy in the picture. Picture B has been sized in Camera Raw to 3404 x 5120 pixels or 17.02 x 25.6 inches then upsized to 20 x 24 using Bicubic Smoother. See how much sharper this is and less pixelated. Now look at picture C which was sized to 4085 x 6144 pixels or 20 x 30.72 inches then cropped to 20 x 24 inches. The improvement is less obvious but very subtle.
So there we have it, a further reason to shoot in Raw and then use the controls available to us in Camera Raw to extract the best from our digital images. Give this process a try, but be aware that you might find different approaches suit your equipment or working methods better.
Lab Sharpening on Steroids
There is another way of dealing with Lab sharpening which many find useful. To overcome the problem of colour fringing after sharpening and to remove the need to mode change into Lab, you can adjust the effect of sharpening artifacts immediately after application (only!) by clicking Edit>Fade Unsharp Mask and then, in the dialogue box, selecting Luminosity as the Mode. You may then adjust the sharpening level as well as reducing the colour fringing. Try it, it may give you an improved effect without the need to mode change. Remember though, you can only fade a filter effect immediately after you have applied it, if you press on with your image manipulation you lose the option.
You are currently on page 1 Contact Terry Hansen
1st Published 01/11/2005
last update 09/12/2022 14:58:53
More Digital Articles
There are 0 days to get ready for The Society of Photographers Convention and Trade Show at The Novotel London West, Hammersmith ...
which starts on Wednesday 15th January 2025


