articles/Lighting/skiplighting-page2
Dave Montizambert's Creating With Light Skip Lighting - part 2 of 1 2
by Dave Montizambert Published 01/04/2012

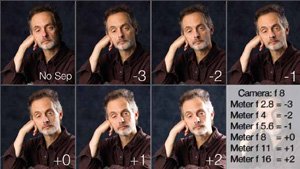
Repeat this process of turning up the strobe unit one stop for each new exposure and then capturing an exposure with camera aperture still set to f 8, do this four more times. Continue as such until you have a range of images that are identical except for this one light that gradually increases in power by one stop each time. You should end up with six images starting with the test light three stops below camera setting all the way up to two stops greater than camera setting (see Image 1). Name each Lightingof these image capture files to reflect the metering ratio, for instance the first image where the camera was set to f 8 and the separation light read f 2.8, name this, "-3 (minus three)", then the next "-2", and so on all the way up to the final capture which would be called "+2 (plus two)". When the backlight is set to the same as the camera setting (f 8 in this case), write this as "+0 (plus zero)". Once your test is completed, compare the differences to get a feel for what you like and for what to expect. Also by metering you will learn to associate numbers or ratios with looks and so will be able to reproduce accurately time and time again. Most portrait photographers are taught to set such a light at one stop darker than the camera setting - a "-1 (minus one)". My favourite is a -1.5 to a -2 incident ratio.

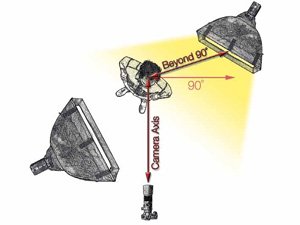
So just why do our incident meters insist on lying to us? The only answer from a higher authority I've been able to get is: since the light is skimming across the subject on such an easy angle, it takes less energy to reroute itself once it strikes the subject. I know, it's kind of a weak answer, but that is the best I've been able to dredge up. From my own observations I have noticed that the subject's skin tone in an area lit by a light beyond 90˚ becomes 'silvery' looking (desaturated), which indicates to me that the light energy we are seeing or capturing is specular, specular as in specular highlight - a specular highlight is a reflection of a light source sitting on the surface of an object. A smooth surface, such as a highly polished auto paint-job, creates a perfect mirror image of the source. A rougher surface, such as my skin, creates a degraded broken-up reflection, since this surface is made up of billions of multi-angled micro surfaces rather than one single surface, we get billions of perfect micro reflections of the light source. Specular highlights are always brighter than the actual tone they sit upon, and since they are angle sensitive, as you move they move too (angle of incidence equals the angle of reflectance). When a specular highlight is broken up into billions of tiny reflections, we find that as you change angle this 'sheen' will appear to change from darker to brighter or vice-versa as less or more micro and macro surface details are on the angle of reflectance.
So your meter is not really a liar, it's just so self absorbed it probably doesn't even know you are there and so doesn't even think about the fact that you and your camera are not necessarily seeing the light on the same angle. Bad! Bad meter!
Please Note:
There is more than one page for this Article.
You are currently on page 2
- Dave Montizambert's Creating With Light Skip Lighting page 1
- Dave Montizambert's Creating With Light Skip Lighting page 2
1st Published 01/04/2012
last update 09/12/2022 14:59:00
More Lighting Articles
There are 0 days to get ready for The Society of Photographers Convention and Trade Show at The Novotel London West, Hammersmith ...
which starts on Wednesday 15th January 2025


