


articles/Lighting/splashtheflash-page2
by Terry Donnelly Published 01/04/2017
3
When working on location, building up large lighting set-ups in areas that are in use by other people, is impractical, often problematic and sometimes impossible with the demands of the building being in use. Besides all of the aforementioned, we have to work fast, and often working with smaller light set-ups affords us higher flexibility and more speed. Working with smaller and easier-to-manage sections, one piece at a time, can help control often hectic conditions.
The technique I often use in circumstances such as this is my ‘splash the flash’ method. I use a localised flash, usually hand-held, and add light to small areas in the frame, and take multiple photographs, each time lighting a different part of the set, until I have splashed light in all the areas I want to add light to [image 2] [image 3].
The multiple photographs are later layered and blended in Photoshop to produce the final image. That may sound really complicated on first reading, but it’s a simple and powerful technique to light large areas with a small single flash causing minimal interruption to guests using the space being photographed.
The Detailed Set-up
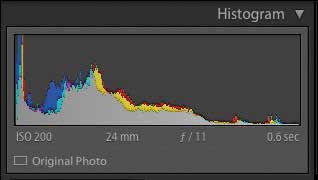
I usually use a tilt-shift lens for this type of shoot, which I use to straighten out verticals, and minimise distortion in the frame at time of capture. The camera is tripod mounted, and I frame the shot and ensure the tripod is secure so it cannot move between frames. I set my exposure and take a picture then ensure it is exposed to adequately capture all highlights and shadow details. A word of warning, never use the image on your camera’s rear screen display as the only way of checking the exposure; it is a good indication as to how the image is being recorded, but the histogram should always be checked for exposure levels and adequate recording of highlights and shadows [image 3].
Good composition is extremely important before going any further, and it’s worth spending a few minutes looking at the scene before proceeding. You are about to invest time and getting it right is important at this point [image 5]. Once I am happy with the exposure and composition of the photograph I take the picture and use this shot as my base image. I then look at the picture and consider what it needs in terms of light, and where I need to introduce flash into the scene.
There are 0 days to get ready for The Society of Photographers Convention and Trade Show at The Novotel London West, Hammersmith ...
which starts on Wednesday 15th January 2025


SWPP - Society of Wedding and Portrait Photographers
The Society of Photographers
Clwyd Chambers, Clwyd Street, Rhyl, Denbighshire, LL18 3LA, UK
Tel 00 44 (0) 1745 356935
Home Page - Find a Photographer - Benefits of Membership - Events and Seminars - Who's who - Photographic Trade Directory - About - Qualification Structure - Mentor Me Programme - Professional Imagemaker Magazine Articles - FREE information pack - Privacy