articles/Software/stitcher5-page1
Stitcher 5 - part 1 of 1
Published 01/11/2005

Panoramas come in all shapes and sizes, - and formats. The one thing you can't do is ignore them! All framed up and mounted on a wall they can provide a focal point for room decor or as an attraction in the foyer of a business premises. Experience teaches that panoramas are good money spinners. Provide your reception venue with a nice pan and you have made a friend of the management; provide your couples with pictures that none of the other guests will have grabbed and you get a unique album. As striking, arresting images they are likely to enhance your reputation and bring in more revenue. If you look at the competition announcement opposite you will see a number of representations of panoramic data, they do not have to be letterbox format - you can go vertical or go spherical. Whist you can stitch images together in Photoshop, this only really works if you have very small amounts of wideangle distortion. Photoshop itself, and a number of camerabased software will join images together but none of them does the job as well as a specialist program such as REALVIZ Stitcher. See the call-out box for more general information to help you if you are a starter-stitcher.
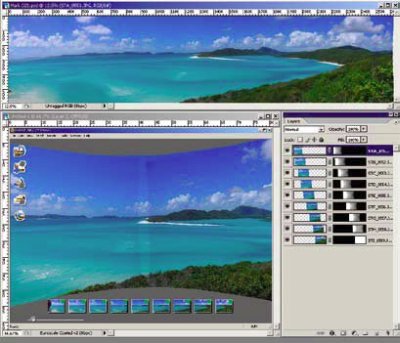
The latest version of REALVIZ Stitcher is number 5 and the interface has been given a complete rework, aimed at improving the simplicity of working. Most importantly, the interaction with Photoshop has been improved, it now can use alpha channels as masks, and the automatic stitching engine has been massively upgraded.
To test the program we started with a deceptively simple image-set, provided by member, Paul Atkins. Paul shot, handheld with a Nikon F70 using negative film and a zoom lens. The images for Stitcher have to be identical size and so we first cropped them in Photoshop, using a crop preset, made to an exact 1500 pixel height. The stitch was challenging for the software for a number of reasons:
1. It was hand held, therefore the horizon angle and position varied slightly.
2. The scene was very low contrast.
3. The foreground was a maze of foliage, swaying in the breeze.
4. The scans do not contain EXIF data to report the exact focal length to Stitcher.

The original scans were 67MB, 3900x6000 pixels and were cropped to 22.5mmx35mm at 1,500ppi to give more manageable 7.9MB files, saved as PSD formats. We stitched in version 4 (which is manual only) in about 2 ½ minutes. Three images had to be force stitched but automatically stitched in when re-adjusted with images on either side (a common tactic when stitching). Previewing took 20 seconds to build a final planar panorama of approximately 3000 x 1500 pixels as did rendering up a JPG final version. Rendering to a Photoshop file took 70 seconds and made a 36.5MB file which included all the layers and layer masks. The resulting file needed some tweaking of the masks to eliminate ghosting in the foliage. Stitcher 5 took a mere 7 seconds to auto stitch the same file set and 5 seconds to Quick Preview. For comparison, we used the built-in Photomerge of Photoshop. This was not a success, the foliage so fooled the software that it placed one of the right-hand images smack in the middle of the assembly.
Notes for Starter-Stitchers
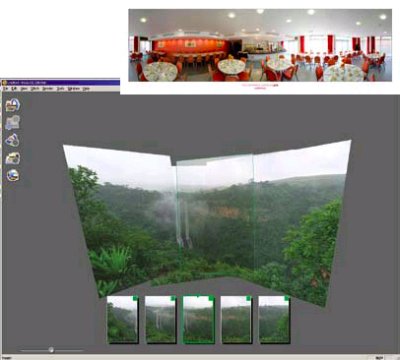
Panoramics are surrounded by their very own jargon set and so instruction in the rudiments may be useful for you. The most important thing is to set your camera on manual focus, manual exposure and manual white balance, then each image will blend seamlessly into its neighbour. Next you should provide an overlap of around 50% (some software likes a little less than this) of each image. Don't forget that putting the camera into vertical orientation gives you more field of view in the vertical plane, at the cost of extra images to get the pan completed. Finally you should strive to keep the image horizon line horizontal and at the same level. This is undoubtedly better achieved by using a tripod with a panoramic, rotating top and even better achieved with a specialist panorama head, such as that shown in the competition announcement (see www.manfroto.co.uk). The final flourish is provided by rotating the camera around the optical axis of the lens, usually a few inches in front of the camera tripod hole. You may achieve this by arching your neck back as you turn but the cost of the visits to the chiropractor may lead you to the purchase of a specialist head such as the Manfroto QTVR series. For full immersive panoramas in which you shoot 360° in the horizontal plane, 45° upwards and 45° downwards and then a north pole and south pole shot to cap it off. This certainly needs a specialist head, but the output does not have to be a QuickTime movie (for web use), you may output almost the entire pan as a hemispherical rendering onto paper as the examples below illustrate.
CONCLUSIONS
Stitcher 5 represents a significant step forward in ease of use and speed of building pans, important in a commercial application. We have only touched on its capabilities but if you follow the instructions included with the competition announcement, you can give it a full trial. Look on the bright side, you can build a competition entry and win a copy or, failing that, you can sell the pan to your client and re-invest the funds in the software! Stitcher is priced at €499, €210 for the upgrade and €950 for the software bundled with the Manfroto 303SPH head.
You are currently on page 1
1st Published 01/11/2005
last update 09/12/2022 14:59:20
More Software Articles
There are 0 days to get ready for The Society of Photographers Convention and Trade Show at The Novotel London West, Hammersmith ...
which starts on Wednesday 15th January 2025


