articles/Weddings/adobealbumdesign-page7
Using Adobe Creative Suite for Album Design - part 7 of 1 2 3 4 5 6 7
by Tom Lee Published 01/10/2009

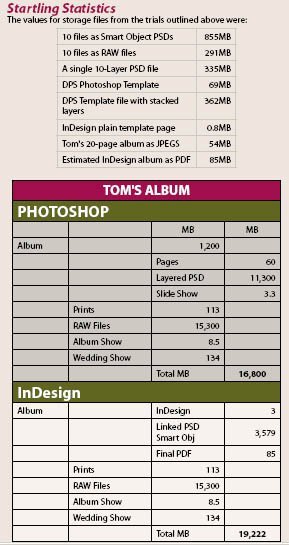
The statistics show that there is little significant difference in storage requirements between the two workflows.
Using InDesign - a biased perspective!
There is no doubt that working with 13 full-sized Photoshop files on a desktop is tedious even with two monitors. Opening the 12 files took 40 seconds. However, you should note that if the files are placed into order in Bridge on its 'lightbox' and then assembled into a Photoshop layer stack (Tools>Photoshop>Load Files into Photoshop Layers) you only need have two files open and can sequentially drag layers across onto the DPS template file. As the files arrive in the DPS template they are much larger than they should be and have to be scaled. Within reason this should only be done once, as resizing a file a number of times can be damaging. In practice, because the files are being used quite small on the DPS, you have more leeway than normal although it is not regarded as good practice. This is a fundamental difference to the way things work with InDesign. With InDesign the files are 'linked' to the page and you can change them as many times as you wish and to any shape you wish, including cropping - everything is reversible.
RAW files cannot be placed directly into InDesign and this is a key disadvantage. There is a simple workaround to the problem though. When a file is opened in ACR there is a button at the bottom labelled 'Open Image'. If you depress the shift key this changes to 'Open Object' and then the RAW file is placed as a Smart Object within a Photoshop file. This Photoshop file may be placed into InDesign. From inside InDesign, if you Alt-double click the image it will open the linked file in Photoshop. If you then double click the Smart Object layer, the ACR Photoshop, you apply a Gaussian Blur (for example) it will be as a Smart Which Workflow Won? Filter and may also be non-destructively changed or reversed.
This then provides unlimited flexibility but comes with two downsides - you have to switch to another program (ie InDesign to Photoshop and back) and you cannot make adjustments with visual reference to an image's companions and surroundings.
To test the InDesign workflow out we labelled 10 of Tom's images from his 641-image group and then had Bridge 'show labelled items only' to give a nice clear view. We then rearranged the files into the page order required so that they were available for dragging and dropping into InDesign. A key advantage is that with the file 'cached' when you drag, if you click and drag in InDesign the file maintains its proportions (shape) and may be placed at the correct size, in the correct place, against any guides you may have set up. This is very much easier than in Photoshop but has a trick up its sleeve. If you select all 10 images in Bridge, they are cached and with each click of the mouse you place the next one in the sequence onto the InDesign page. The only downside is that your carefully arranged picture order is messed up by the caching (something for Adobe to look at for CS5!).
In our tests it took 8 seconds for 10 files to cache and we averaged a little under a minute to place and scale all 10 images, including finding the correct order sequence. It is certainly a nicer way to place images on a page than grinding them about in Photoshop. Moving back to Photoshop, adjusting the settings in ACR, saving and getting back to an up-dated InDesign page took about 30 seconds total. A similar time was required to move a file back to Photoshop and blur it to make a backdrop or, for example, change an image to greyscale.
Overall then, InDesign is much faster at placing images on the page. The penalty for having to make a Smart Object PSD file for placement into InDesign is also smaller than the penalty for having to store a large layered PSD file.
A hybrid solution of making layered PSD files and placing them directly into InDesign is attractive as it offers the possibility of adding pagefurniture detailing, using vector art, but keeps the ability to colour correct layers in Photoshop. Making a multi-page InDesign album using Tom's layered PSD files took less than a minute and we were able to make a press-ready 20-page final PDF in 1m 50s.

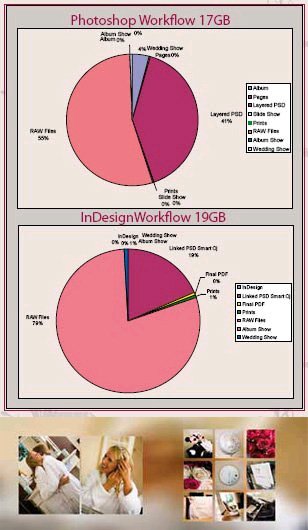
ABOVE TOP: This is essentailly the same data presented graphically. What it shows is that the RAW files always dominate the storage requirements (think about that before you hold the motor drive button down!). The linked Smart Object PSD files are smaller than layered PSD files as used by Tom but not enough to influence the storage requirements greatly. ABOVE BOTTOM: A final twist for InDesign users. Once the files are cached from Bridge, if you hold the Ctrl-SHift keys down and drag all nine files are scaled, proportioned and spaced in one click, it really is very cool to use!
Which Workflow Won?
Sadly we have to stay sitting firmly on the fence. The sums, statistics and stopwatch work were vital to establishing the facts, but they show that there is very little difference between an InDesign workflow and a Photoshop workflow. The storage requirements are similar with InDesign requiring 12% more space on your hard drives. To our surprise the use of Smart Objects within PSD files actually saved file space.
The final analysis is this: if you have InDesign, and the skills to use it already, then it is well worth looking at. This is particularly so if you wish to use page numbering and repeating page decorations, along with the ability to harmonise your colour scheme. If you like smooth gradient image blends across your pages, a Photoshop file is better. If you are somebody who changes their mind a lot during the page-designing process then InDesign is more forgiving of your file integrity if you keep changing the sizes of the images on the page. Things like strokes and drop shadows are superior quality and much faster to apply with InDesign and if you exploit Object Styles you can change every key line (stroke) in your album with one click of the mouse. Finally if you place text, poems or illuminated lettering in your albums then InDesign is the winner. We make no apology for burdening you with lots of timing and statistics, somebody has to do it, for all we knew at the outset one method might have been a country mile superior to another, now we know it is quite a close decision. The pie charts tell the whole story. The file storage requirements are dominated by the RAW files primarily, then the Photoshop files. The only other figure worth noting is that the upload times for both workflows would be even closer if we had made the final files the same resolution, the pdf was made at a press-ready 300dpi compared with 250dpi for the JPEG. This too is a point worth bearing in mind - some bureau will not accept pdf files, only JPEGs or Tiffs. InDesign does a poor job of exporting in JPEG format and this specific workflow should be avoided.
Before you make your mind up take a look at the picture below. If you thought Photoshop was a handful to learn then the combined Illustrator and InDesign offer even more hours of fun - the choice is yours!
Please Note:
There is more than one page for this Article.
You are currently on page 7
- Using Adobe Creative Suite for Album Design page 1
- Using Adobe Creative Suite for Album Design page 2
- Using Adobe Creative Suite for Album Design page 3
- Using Adobe Creative Suite for Album Design page 4
- Using Adobe Creative Suite for Album Design page 5
- Using Adobe Creative Suite for Album Design page 6
- Using Adobe Creative Suite for Album Design page 7
1st Published 01/10/2009
last update 09/12/2022 14:50:50
More Weddings Articles
There are 0 days to get ready for The Society of Photographers Convention and Trade Show at The Novotel London West, Hammersmith ...
which starts on Wednesday 15th January 2025


