articles/Lighting/alikenesspaintedwithlight-page1
A likeness painted with light - part 1 of 1 2 3
by Mike Williams Published 01/04/2008

One of the most important skills that we as photographers must learn is the 'Seeing and Controlling of Light'. From the tuition days I run at my studio and talks I given at conventions I am finding that more and more "photographers" (People who Paint with Light) just do not know, or understand, what to do when setting up portrait lighting.
One of the most basic of skills inStudio photography is reading light and controlling light. Now we have gone digital it would seem to me that many photographers feel it unnecessary to learn these basic skills, resulting in the use of the Auto settings. Whenever a photographer phones me about difficulty with consistency of colour and exposure they are advised to go back to basics, that is use RAW file and manual setting, this normally removes 95% of problems.
My intention over the next few articles is to share with you my Lighting Techniques for a Professional Portrait Studio. I have always believed that to learn anything, you start with the basics.
The most common question I am asked on portrait lighting is, "How do I create High Key Lighting?" This style of portrait is now fashionable, and photographers have been creating it since the advent of photography itself.
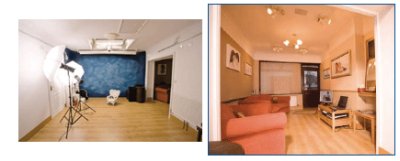
My studio is a part of my home therefore space is at a premium, the camera room is 6m x 4m (20'x12') and reception 3m x 4m (10'x12') it is designed for family and children's portraits, with the use of a wraparound background and now digital back grounds, I can set up groups up to 20 people
The Studio
"A Room for an Artist to Create his or her work"
Does size matter? 'Yes' - Too small and you will distort your sitter, too large and your sitter may feel intimidated or lost in the room.
Basic Dimensions
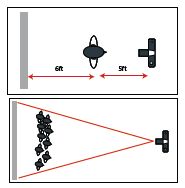
For an adult portrait and a camera to subject distance no closer than five feet (1.5 metres). From sitter to background five to six feet (1.5 - 2 metres).

The length of the room should be 6 ft + 5 ft + room to move back. To cover the largest group, using a standard lens on camera (using wide lens will distort people on the outer edges), move back to cover group, with space each side. You will quickly learn you maximum group size.
The height is determined by the groups you will take. Larger groups require some of the clients to be standing. A minimum of nine feet (2.75m). To allow for subject plus space for hair lighting. High Glidetracking will need a higher ceiling 10-12 ft. (3-4m).
Wall covering is white with the facility to draw in black curtains.
Floor is laminate, easy to clean. Camera stands and lighting are easy to move.White Ceiling.
Backgrounds. Blue mottled painted also black, grey and white vinyl
You are currently on page 1
- A likeness painted with light page 1
- A likeness painted with light page 2
- A likeness painted with light page 3
1st Published 01/04/2008
last update 09/12/2022 14:51:00
More Lighting Articles
There are 0 days to get ready for The Society of Photographers Convention and Trade Show at The Novotel London West, Hammersmith ...
which starts on Wednesday 15th January 2025


