


articles/Lighting/alikenesspaintedwithlight-page2
by Mike Williams Published 01/04/2008
Lighting.
Unless you are using a daylight studio you will need lighting. For most small to medium studios the 'Mono Light' is the first choice. I personally use Bowens Esprit 500s. Whatever you choose it is best to keep them all matching. To start you will need two or three lights and as your studio grows, you will need between six and seven lights. Light modifiers such as brollies, soft boxes, etc will add diversity to your lighting. As I am starting with basics, my suggestion is to have a pair of translucent brollies. These can be used for most basic portrait lighting.
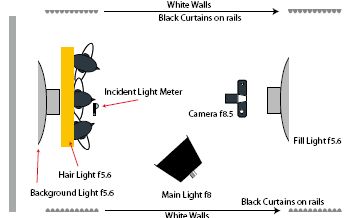
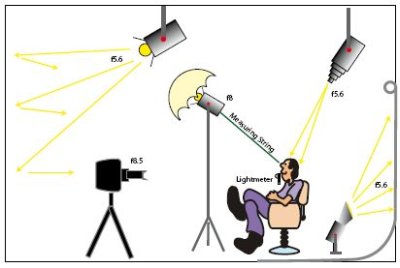
Lighting Layouts
See the opening spread also:
1. Fill light: This is a diffused light that gives an even light across the subject. Its main purpose is to illuminate the shadows.
2. Main Light: This is your 'paint brush', it shapes the light and creates the three-dimensional effect in your portrait. It lights the eyes and paints shadows. It is mounted for ease of use and highly maneuverable. Main light power is normally 1 to 1 1/2 stops brighter than the fill light.
3. Hair Light: To illuminate the hair, to give separation from the background (high key work often does not use this light). The hair light is set at the same power as the fill light.
4. Background Light: Light for the background, to create separation from the background and to balance the lighting coming from the fill light. Coloured gels or snoots can add special effects. Careful attention has to be paid to the spill of the light from the fill and main lights. High key backgrounds require at least two or maybe four lights to create an even, white background.
5. Kicker lights in some portraits: These are lights which come from behind the sitter(s) and highlight props, etc, to great effect. Keep it simple use as few lights as possible, but as many as needed to do the job correctly.
Backgrounds
Today the style is towards simple backgrounds. For high key work you will need a white background that covers from background to foreground. It should be of a material that has a matt surface and is easy to clean. Some studios use paper, but this is quickly damaged. For years I used the reverse side of a piece of vinyl flooring, painted white. I now use a white background purchased at Focus from a company called Viewfinder. This is much lighter than the vinyl, and does not need painting.
Grey and medium coloured backgrounds are good for coloured gels or creating lighting effects.
Using black backgrounds for low key work, where the background disappears to give a solid black background, is particularly effective in monochrome work.
It is best to have backgrounds permanently attached to the ceiling or wall. Motorised backgrounds are a luxury. As with all equipment, fixtures and fittings you should always consider Health and Safety Regulations.
There are 0 days to get ready for The Society of Photographers Convention and Trade Show at The Novotel London West, Hammersmith ...
which starts on Wednesday 15th January 2025


SWPP - Society of Wedding and Portrait Photographers
The Society of Photographers
Clwyd Chambers, Clwyd Street, Rhyl, Denbighshire, LL18 3LA, UK
Tel 00 44 (0) 1745 356935
Home Page - Find a Photographer - Benefits of Membership - Events and Seminars - Who's who - Photographic Trade Directory - About - Qualification Structure - Mentor Me Programme - Professional Imagemaker Magazine Articles - FREE information pack - Privacy