articles/Monitors/calibrationeternalproblem-page2
Calibration - The Eternal Problem - part 2 of 1 2 3 4 5 6
by Tom Lee Published 01/02/2001
Scanning
For true calibration, if you posses a scanner, it should also be calibrated along with the monitor and printer. There are also many different ways to calibrate scanners, some of which are provided by the manufacturer. This however, involves another process and is not as important as getting the other two right. What we are more concerned with is the likeness between the monitor and the finished print.
We will start by selecting an appropriate negative (or print) for scanning. It should have plenty of colour (reds, greens, blues, yellows and of course flesh tones for portrait/wedding work). Leave the scanner settings at the manufacturers defaults and select only the area of the image you want to scan. Selecting any of the surrounding areas outside of the image may affect the colour interpretation. If you can do another pre-scan at this stage then do so, it may give you better colour accuracy when doing the actual scan. Scan the image at your scanners maximum optical resolution.
Do not use an interpolated resolution, as this will tend to impair colour accuracy. When using interpolated scanning resolutions, the computer guesses the colours between adjacent pixels to create new ones. When creating image resolutions higher or resizing images, its best to use Photoshop which has much better algorithms for doing this type of work.
When the image is on screen, compare it to the original. It probably doesn't look right but will be similar. We can always adjust the image later so don't worry about it yet. Do not adjust any scanner settings or monitor colour settings. Save the image and then move onto the next stage.

Monitor Calibration
This section covers the use of ICC profiles and monitor colour space. At this stage if you have the article on ICC profiles and how to install them, now would be a good time to read it.
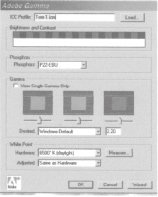
Once you have your profile associated with the "monitor" things get a lot easier. However, not all monitors are provided with a profile but Photoshop 5.0 (or higher), allows you to create your own using the "Adobe Gamma" program.
If your scanned image is not open, then open it, and set the image to fill the available space so screen. Press (Ctrl and 0) at the same time.
This is so that we have a reference image, which in theory has not been contaminated by fiddling about on your PC. Alternatively, if you do not have a scanner or have images scanned for you, choose an image from the Adobe Photoshop sample folder. Using the rectangular selection marquee tool, select approximately half the image and choose Image>Adjust>Desaturate. This effectively creates half the image in black and white, giving us a reference point for colour casts.
These are much easier to see in the lighter areas of grey in the test print.
Please Note:
There is more than one page for this Article.
You are currently on page 2
- Calibration - The Eternal Problem page 1
- Calibration - The Eternal Problem page 2
- Calibration - The Eternal Problem page 3
- Calibration - The Eternal Problem page 4
- Calibration - The Eternal Problem page 5
- Calibration - The Eternal Problem page 6
1st Published 01/02/2001
last update 09/12/2022 14:52:05
More Monitors Articles
There are 0 days to get ready for The Society of Photographers Convention and Trade Show at The Novotel London West, Hammersmith ...
which starts on Wednesday 15th January 2025


