


articles/Monitors/calibrationeternalproblem-page5
by Tom Lee Published 01/02/2001
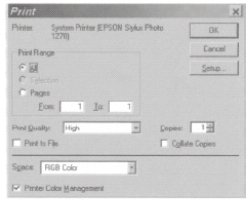
To create a custom printer profile for a specific type of paper, we start with defining the colour space for the printer to interpret the image data. I have found that RGB Colour works best. The Printer Colour Management box should now be highlighted because we are no longer using the standard Epson ICC colour management. Your screen should now look something like the one shown here. Proceeding through the setup menus as we did before, we get to the "Advanced" page.
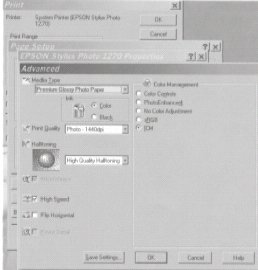
Instead of clicking ICC, this time highlight the Colour Controls radio button and a new set of options appear.
After the initial shock of seeing all the various controls and options available, don't give up, I'll try and explain it as best I can.
The "Media Type" dialogue box gives various options for the type of paper being used, such as Glossy, Plain Paper etc. Remember, if you are using a paper other than Epson's, a degree of experimentation may be required before you get the right combination.
"Print Quality" should be selected most appropriate for your needs. When printing on the heavy duty photo papers always use the highest setting available.
"Halftoning" is the degree of tonal change between individual dots in the print. For photos this should be set to High Quality. If your printer is equipped with a bi-directional cable, the High Speed checkbox will be automatically highlighted.
If you are given the option to select a Gamma value, set this to 1.8. This is a universal value that most printing devices use for output, and is different to the operating system Gamma.
(2.2 for Windows, 1.8 for Mac) The "Mode" dialogue should be set to Photo-realistic for Photos. This increases the saturation and density of the output, which closely matches that of conventional wet process prints.
The remaining sliders increase or decrease the values concerned (colour, contrast etc..), but should only need fine adjustment. The settings indicated in the screenshot are my personal settings for one particular type of paper. For your first print try leaving them all set to zero.
Click the Save Settings button and give it a name. This is your own personal ICC profile for your specific paper and ink type, and all it cost you was a little time and patience. You will need to undertake this operation for each different type of paper you intend to use, but once it has been done, you can leave it alone and call it up at any time using the Custom dialogue box.
There are 0 days to get ready for The Society of Photographers Convention and Trade Show at The Novotel London West, Hammersmith ...
which starts on Wednesday 15th January 2025


SWPP - Society of Wedding and Portrait Photographers
The Society of Photographers
Clwyd Chambers, Clwyd Street, Rhyl, Denbighshire, LL18 3LA, UK
Tel 00 44 (0) 1745 356935
Home Page - Find a Photographer - Benefits of Membership - Events and Seminars - Who's who - Photographic Trade Directory - About - Qualification Structure - Mentor Me Programme - Professional Imagemaker Magazine Articles - FREE information pack - Privacy