articles/Photoshop/canvasartrecipe-page1
Canvas Art Recipe - part 1 of 1 2
by Tom Lee Published 01/11/2007

Part of the photographer's art, particularly when it comes to wedding photography is not always about creating great masterpieces from every image you take during a long and stressful day. Most of the time it's about consistency and capturing the memories of the happy couple at a high standard, after all it's their day not yours.
I have always maintained that simplicity is the start of a good image. Get the basics right consistently and your client will always be happy with their product. There is always room for creativity, however, and with the aid of a few simple plug-ins and Photoshop, a good image can be made into a work of art, setting your wedding coverage out from the crowd.
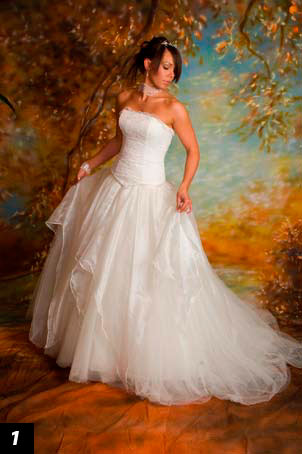
Lets start by opening a sample image, one that would sit quite happily in the album or as a framed print over the fire in the sitting room. The image shown [1] was taken as part of a post bridal sitting and opened in Photoshop without resizing. Stage 2 involves creating a border around the image by increasing the canvas size. Making sure that the background colour was white, from the dropdown menu we chose image>canvas size> 20 inches high by 16 inches wide. For ease we created a canvas that was equal to a standard print size.
The next stage is to create a duplicate of the original. Select image>duplicate from the dropdown menu. We don't need to name it, just click OK. This image will be deleted after we have finished with it. We then reduce the duplicate image by selecting image>size and making the duplicate 10 inches by 8 inches (proportional to the original). We are going to apply filters to the image and the programs work more quickly on smaller images.

The next step is to use a cheap plug-in that replicates the painting process. Corel Painter does a fine job but costs quite a bit more than Art Studio Pro 2 by Twisting Pixels (twistingpixels.com), which is downladable over the net for around $99. Once loaded it can be found in the filter menu of Photoshop. Select filter>twisting pixels>Art Studio Pro and another interface is launched.
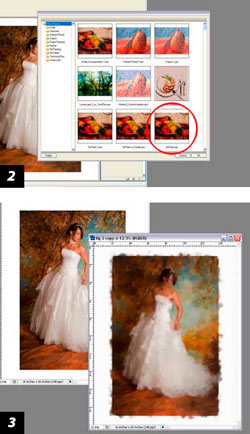
When you have time to play it is extremely customisable but you can achieve results quickly by choosing one of the presets. Choose one of the Oils Presets and click OK [2].
After about two minutes a preview of the finished artwork is shown. Now click the Apply button - this takes about three minutes and is the longest part of the process. When complete, we need to resize the image back to its original proportions of 20 inches by 16 inches (image>image size). It doesn't look much at the moment (quite a mess really) but you should be of the mindset that you are creating art, not an exact likeness as we would be in photography [3].
You are currently on page 1 Contact Tom Lee
1st Published 01/11/2007
last update 09/12/2022 14:52:13
More Photoshop Articles
There are 0 days to get ready for The Society of Photographers Convention and Trade Show at The Novotel London West, Hammersmith ...
which starts on Wednesday 15th January 2025


