articles/Paper/canvasoptions-page2
Paper Chase - Canvas options - part 2 of 1 2 3 4 5 6 7
by Mike McNamee Published 01/08/2004

Plan you image
More care is need before you shoot for an intended canvas mounted print. Articulated stretcher frames are only available in imperial sizes and you should bear the following points in mind:
1. You need a 2" border of blank canvas around your image, which can be dragged around the stretcher. If you are using a desktop inkjet printer this will limit your image size to 4" less that the throat of the printer.
2. The process of stretching is not as precise as other forms of mounting and you should allow about half" of "dead space" which is part of the image but not vital to the composition. This gives the framer some leeway when pinning the canvas onto the stretcher frame.
3. Stretcher frames are available in the imperial sizes 10x8; 12x10; 16x12; 11x14; 20x16 and 20x24.There are others but check first with your framer.Your image planning should take account of the fact that the aspect ratio of a 10x8 is quite different to that of a 35mm frame and different again to most digital detectors.
4. Your image design should also allow for the fact that the rabbet inside the stretcher frame loses you an additional 10mm (1/4 to 3/8 of an inch). You composition might look dynamic with a subject close to the frame edge but all the bets are off if it disappears behind the rabbet!
Setting up in Photoshop
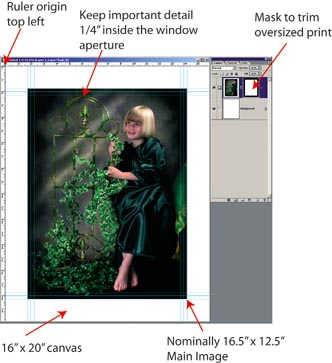
If you are going to print your image on your own inkjet you have the ability to plan it out with the correct image dimensions and place guides so you can judge the composition more accurately. Here is a typical set of instructions
1. A nominal image size of 16x12 inches is assumed.

2. Make an RGB file at 200 ppi, 20" high and 16" wide, using the RGB workspace profile of your choice (usually sRGB or Adobe RGB 1998 - ask your lab if it is to be printed there).
3. Click View>Rulers then right click within the ruler bar and choose "inches" for your units.
4. Click View>New Guide and make a vertical guide at 2" then another at 14".Then make a horizontal guide at 2" and then another at 18"
5. Place another set of guides inside the first set by the rabbet width. TIP: If the rabbet width is metric (ours was) change the units to mm and move the origin to the intersections of the corners. We set ours 10mm inside the first set. This inner set now shows the actual window into which the image will eventually show.
6. To simplify your guides you could now delete the outer four guides using the Move tool to drag them off the screen. If you cannot perform this move click View then uncheck the Lock Guides tab.
7. Now place guides ¼" outside and ¼" inside those which define the aperture of the swept frame. The ½" space between them is the "dead space" which has to have image on it but be unimportant to the composition.
8. Now save your file and call it 20x16 port template.psd (or some other name just be sure you know which it is).
9. In Windows Explorer, right click on the icon of the newly saved file, click "Properties" and check the "Read only" box, then Apply. This means that you cannot save over the file and you will be prompted to to give your template a new name each time you use it. You don't have to do this bit but it will help in the long run.
10. Open your original image file and Shift drag it with the Move tool to place it centrally onto your template image. If you need to move or adjust the image size either use the move Tool or hit Ctrl-T and rescale the image with the shift key held down to constrain the proportions.
11. To make the final adjustments drag the Rectangular Marquee around the outer guides then hit the Make Layer Mask icon in the layers palette. Now uncheck the chain icon between the Layer Mask and the Layer image icon in the Layers Palette the click on the image icon so that a brush is showing alongside the visibility eye. With the Move Tool you can now make final adjustments to the position of the image within the frame. If you want to see how the image might look from within the window of the swept frame drag the marquee around the inner guides and make a mask from that.
12. If you are very particular, you could also make a template which has a picture of your swept frame and place the image within that for your final look. This device can also be used as a selling aid to when showing your client their portraits.
13. Ensure when you print that you have the "centre image" box checked on your Epson printer or the image will not be central on the media.
Please Note:
There is more than one page for this Article.
You are currently on page 2
- Paper Chase - Canvas options page 1
- Paper Chase - Canvas options page 2
- Paper Chase - Canvas options page 3
- Paper Chase - Canvas options page 4
- Paper Chase - Canvas options page 5
- Paper Chase - Canvas options page 6
- Paper Chase - Canvas options page 7
1st Published 01/08/2004
last update 09/12/2022 14:52:13
More Paper Articles
There are 0 days to get ready for The Society of Photographers Convention and Trade Show at The Novotel London West, Hammersmith ...
which starts on Wednesday 15th January 2025


