articles/Software/coldigdarkroom-page3
The Colour Digital Darkroom by Paul Gallagher - part 3 of 1 2 3 4 5 6 7
by Paul Gallagher Published 01/07/2016

4
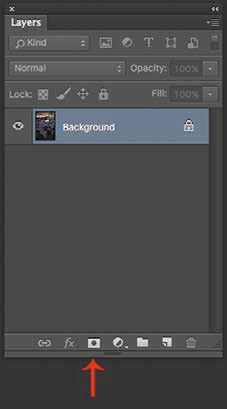
To understand what my feather looked like I clicked on Quick-mask in the bottom of the Tool Box (See Image 4) and a red mask shows on my image. By default, the area of red is protected from my adjustment and the area of the image showing through will be affected by my adjustments and the transition between the two is controlled by the feather I set. I then created a new curves adjustment layer by clicking on the black and white circle at the bottom of my layers palette (See Image 5) and a new layer appeared and at the same time a curves dialogue box appeared (See Image 6).

5
The Curves dialogue box consists of two axes, which gradually transform from solid black to solid white, and a diagonal line. One end of the line represents white and the other represents black. If we click on any part of that line and drag it up or down we will begin to alter the tones in our image. For example, if we push the line upwards we will lighten the area we have selected in our image, if we pull the line downwards we will darken the area we have selected and if we make an 'S' shape curve line we will increase contrast and if we make a reverse 'S' shape curve line we will lower contrast. With these simple controls we can do all that we ever did in the darkroom (and some!) and we have an amazing amount of flexibility to explore all the tones in our image. All that remains is to try this technique out as often as you can whilst altering the feather of the section according to the portion of the image you are intending to alter. If this process is followed you can, with a little practice, have a finished image whereby the tonal adjustments you have made, are not obvious, but the image has come to life during the process.
Please Note:
There is more than one page for this Article.
You are currently on page 3
- The Colour Digital Darkroom by Paul Gallagher page 1
- The Colour Digital Darkroom by Paul Gallagher page 2
- The Colour Digital Darkroom by Paul Gallagher page 3
- The Colour Digital Darkroom by Paul Gallagher page 4
- The Colour Digital Darkroom by Paul Gallagher page 5
- The Colour Digital Darkroom by Paul Gallagher page 6
- The Colour Digital Darkroom by Paul Gallagher page 7
1st Published 01/07/2016
last update 09/12/2022 14:52:33
More Software Articles
There are 0 days to get ready for The Society of Photographers Convention and Trade Show at The Novotel London West, Hammersmith ...
which starts on Wednesday 15th January 2025


