articles/Photoshop/extractionshotto-page2
Extractions How to do it without going near your dentist - part 2 of 1 2
Published 01/05/2003

3. Choose Image > Extract.
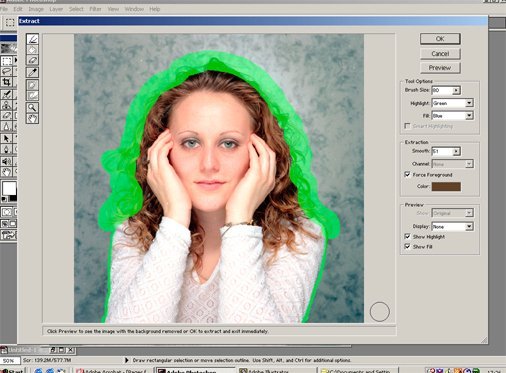
4. In the Extract dialog box, select the Force Foreground option. You'll start by selecting the colour on which to base your selection. The Force Foreground technique works best with objects that are monochromatic or fairly uniform in colour.
5. Select the eyedropper tool in the Extract dialog box, and then click a light area of the girl's hair to sample the colour to be treated as the foreground.
6. Select the edge highlighter tool in the Extract dialog box.
7. For Brush Size, use the slider or enter a value to select a fairly large brush (we used 20 or 30).
8. Drag to begin highlighting the wispy ends of the hair where they overlap the background.

9. When you've gone around the hair continue down the white blouse. Keep close to the edge of the blouse as you will find it easy to remove material on the inside. This is one of the problems with the Extract Tool, it is not very clever! The highlight should be solid.
10. Choose Gray Matte from the Display menu in the Extract dialog box. A grey matte provides good contrast for a light-coloured selection. For a dark selection, try the Gray or White Matte option. None previews a selection against a transparent background.
11. Click the Preview button to preview the extracted object.
12. To view and refine the extraction, use one of the following techniques: o Use the Show menu to switch between previews of the original and extracted images. o Select the Show Highlight or Show Fill option to display the object's extraction boundaries. When you have finished editing, click Preview to view the edited extraction. You can edit and preview the extraction repeatedly until you achieve the desired result.
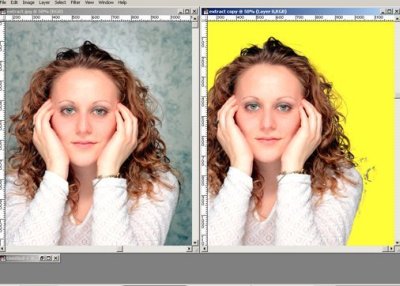
13. When you are satisfied with the selection, click OK to apply the final extraction. All pixels on the layer outside the extracted object are erased to transparency.
Extract dialogue box you highlight the area that is to be used to generate the cut out. Thenyou fill the interior and perform a Preview to see the effect of your work.
You should make a duplicate file or duplicate the Background layer so that you can make repairs using the CloneTool for any areas that are incorrectly removed by the Extract Tool. Ears in particular are sometimes nibbled away!
Please Note:
There is more than one page for this Article.
You are currently on page 2
- Extractions How to do it without going near your dentist page 1
- Extractions How to do it without going near your dentist page 2
1st Published 01/05/2003
last update 09/12/2022 14:54:05
More Photoshop Articles
There are 0 days to get ready for The Society of Photographers Convention and Trade Show at The Novotel London West, Hammersmith ...
which starts on Wednesday 15th January 2025


