articles/Lighting/fakingit-page1
Lighting for digital Dave Montizambert Faking It - part 1 of 1 2 3 4
by Dave Montizambert Published 01/06/2011

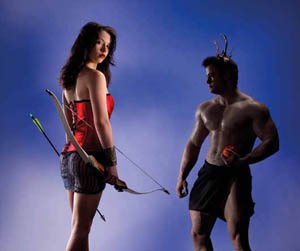
Most studio photographers buy backgrounds for what they are and not for what they could be. These backgrounds are usually evenly lit and somewhat correctly exposed, however, if you use a little imagination and have a little knowledge of how light works you can create some truly unique backgrounds from a simple neutral coloured surface like a wall or seamless backdrop paper. Case in point, if you look at the skyscape backdrop behind models Shandy Nickerson and Scott Putman in my image entitled "Trust" (see Image 001), you will see a big fat lie for a background - this fake background is an illusion created with lighting effects. By carefully crafting shadows on a white seamless backdrop, the background behind the subjects appears to have depth even though it is just a flat surface. The most important control for making this fake background work is controlling the edges of the shadows, the trick being to make these shadow edges really soft or fuzzy. In a reallife skyscape, clouds have soft edges and so in Image 001 the background shadows need to mimic this if the sky illusion is to work. Creating soft-edged shadows for this background is mainly about size and distance of the background light source.

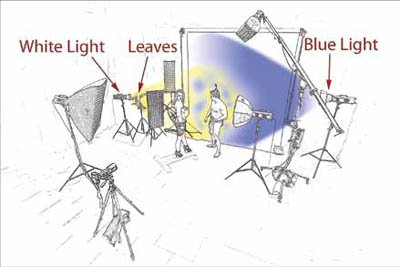
In Image 001, the background appears to be a blue sky with fluffy white clouds; to create this simulated sky, a mono-block studio strobe (flash) fitted with its parabolic reflector was placed to the camera-right-side of a white seamless backdrop paper (a white wall works just as well), see Image 004. The strobe was horizontally angled so that it was aimed at the other side (the camera-left-side) of the paper. Feathering the light in this way towards the opposite end of the seamless paper helped to even out the exposure over the whole background. The light from this source was made blue with the addition of a Roscolux Sky-Blue number 68 gel over the light-source's front, see Images 002, 003 and 004. This blue gel is very dense and so absorbs several stops of light, if you find you don't have the power to get the brightness you want, consider creating a less intense blue background by using a less dense, less intense blue gel such as a blue correction gel which corrects 3,200° Kelvin tungsten light to 5,000° Kelvin daylight light - this lighter blue gel absorbs less light. Once the gel was in place, the power of the strobe was dialed up or down until a -1 to -2 reflective meter reading was obtained over the surface of the white paper - a minus one means that it reads one stop darker than the camera exposure setting, and a minus 2 means that it reads two stops darker than the camera exposure setting.
You are currently on page 1
- Lighting for digital Dave Montizambert Faking It page 1
- Lighting for digital Dave Montizambert Faking It page 2
- Lighting for digital Dave Montizambert Faking It page 3
- Lighting for digital Dave Montizambert Faking It page 4
1st Published 01/06/2011
last update 09/12/2022 14:54:07
More Lighting Articles
There are 0 days to get ready for The Society of Photographers Convention and Trade Show at The Novotel London West, Hammersmith ...
which starts on Wednesday 15th January 2025


