


articles/Software/lightroom3noise-page2
by Art Suwansang Published 01/06/2011
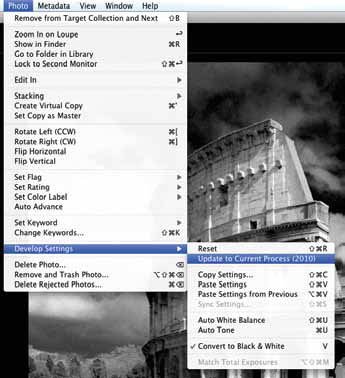
However, if your files fall into the second category, i.e. they have been processed with an older version of ACR and have XMPs sidecar files, or your Lightroom catalogue was upgraded from a previous version, then you would have to enable PV 2010 manually. Keep in mind that PV 2010 is an entirely new algorithm and it has a tendency to minimally change the look of your previously processed images. One way you can tell if your images were processed with PV 2003 is through the exclamation point notification that shows up on the lower right corner of the loupe view area, in the development module (fig. 01). If there's no notification then you are using the latest process version. To update the processing algorithm to PV 2010, simply click on the exclamation point notification, and then a dialogue will appear asking if you would like to update only the selected image or all of the images in the filmstrip (fig. 02). In this dialogue you will also have the option for Lightroom to show you a before and after updated image in a side-by-side comparison as well. Another way to do this is in the library module, where you would simply select all of the previously processed images that you would like to update to PV 2010, go to the menu Photo, click on Develop Settings, and select "Update to Current Process (2010)"; now you are done (fig. 03).
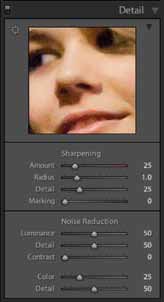
PV 2010 also comes with another benefit, as mentioned earlier, the new noise-reduction algorithm. The issue that we face here with modern DSLR (digital SLR release on or after 2007) is noise; luminance noise to be specific. The other type of noise that we used to focus the majority of our attention on is colour noise. Luminance noise is lesser known but more prevalent in modern DSLR, especially images taken with high ISO. The luminance noise-adjustment interface and control is located in the Development Module on the right panel, listed in the detail panel. It has a very simple interface, with just three parameter control sliders (fig. 04), one more than the older versions. Of the three sliders, luminance is the primary noise reduction slider. Besides luminance, there is the detail slider, controlling the amount of edge details preserved after noise reduction, and the contrast slider, to manage the contrast amount in the area reductions. And although, the luminance noise reduction took the main stage, PV 2010 also made an improvement on the already great colour noise-reduction as well. Similar to the luminance noise reduction, the colour noise reduction got a new additional detail slider to control the threshold of the colour noise, preserve fine edges and shape defining lines. The comparison matrix for the various Process Version noise reductions is shown in figure 5.
There are 0 days to get ready for The Society of Photographers Convention and Trade Show at The Novotel London West, Hammersmith ...
which starts on Wednesday 15th January 2025


SWPP - Society of Wedding and Portrait Photographers
The Society of Photographers
Clwyd Chambers, Clwyd Street, Rhyl, Denbighshire, LL18 3LA, UK
Tel 00 44 (0) 1745 356935
Home Page - Find a Photographer - Benefits of Membership - Events and Seminars - Who's who - Photographic Trade Directory - About - Qualification Structure - Mentor Me Programme - Professional Imagemaker Magazine Articles - FREE information pack - Privacy