articles/Software/lightroom3noise-page4
Lightroom 3 Noise Control & Lens Tool - part 4 of 1 2 3 4 5
by Art Suwansang Published 01/06/2011

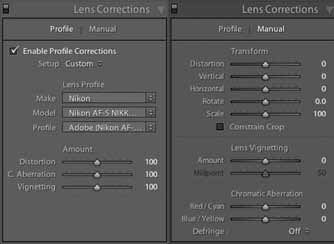
The lens profile correction is rather easy to use (fig. 07 left); most of the time it is a matter of clicking the check-box to enable it. However, if we know a little more about the other functions and sliders, we can override some of the automated functions and make the tool fit better with individual styles of work. Right beneath the check box, labelled "Enable Profile Corrections", is a dropdown list called "Set Up"; currently it should be on default. Right below that we have the Lens Profile listed by make, model, and the profile. Generally, Adobe profiles are the ones covered in the profile list; however, if you like you can bring in other profiles as well. Below this is the section called Amount; this is where most of the control happens. Listed under this section is the distortion where you can manually add or remove any lens distortion from your image. "C. Aberration" allows you to change the chromatic aberration correction amount in an image. And finally "Vignetting" is where you can control the natural vignetting that occurs in an image.
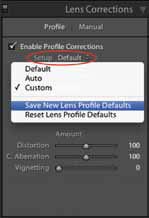
By default, all of the amounts of adjustment listed under this section are set to 100; this is considered the neutral adjustment, where the profile performed the correction to normalise the image with no additional alteration. One of the adjustments most relevant to photographers in this case is the Vignetting correction; the default setting at 100 takes all of the natural light fall-off away from the corners of the image. If desired, we can override the setting and bring back the natural fall-off by decreasing the slider value; personally, I like the light fall off so I set mine to 0. Since I don't want the Lens Profile Correction to make an alteration to the light fall-off every time I apply it, I will then go back to the "Set-up" dropdown list in figure 8, click on it and select "Save New Lens Profile Default." Once you've done this, every time the lens profile gets applied, it will only correct for the lens distortion and the chromatic aberration, while leaving the natural light fall-off effect alone. Keep in mind that other adjustments can be made into defaults following the steps above.

Now that we know how to use lens correction functions, let's take our Lens Correction up to new heights by utilising the Manual correction. The Manual lens correction panel is broken down into three parts: transformation, lens vignetting, and chromatic aberration, figure 7 right. Listed under the transformation is the ability to further increase or decrease the distortion beyond the lens profile correction. Additionally, we can now correct for perspective, plus vertical and horizontal distortion using the Vertical and Horizontal slider respectively (which comes in handy to correct for converging lines when photographing buildings similar to figure 9). We also have the rotate tool that functions similarly to the crop overlay tool, however, this tool will prevent the crop from constraining to the image pixels, i.e. crop can includes areas where there are no pixels (grey background). We then have the scale tool that allows us to zoom in and out of the image similarly to the crop overlay tools. Finally comes the Constrain Crop check-box; if you check this any transformation applied will automatically scale into the pixel areas to omit the grey background (fig.10).
Please Note:
There is more than one page for this Article.
You are currently on page 4
- Lightroom 3 Noise Control & Lens Tool page 1
- Lightroom 3 Noise Control & Lens Tool page 2
- Lightroom 3 Noise Control & Lens Tool page 3
- Lightroom 3 Noise Control & Lens Tool page 4
- Lightroom 3 Noise Control & Lens Tool page 5
1st Published 01/06/2011
last update 09/12/2022 14:55:59
More Software Articles
There are 0 days to get ready for The Society of Photographers Convention and Trade Show at The Novotel London West, Hammersmith ...
which starts on Wednesday 15th January 2025


