articles/Photoshop/photoshopimpressions-page4
Montizambert Photoshop Impressions - part 4 of 1 2 3 4
by Dave Montizambert Published 01/06/2005

However in the case of Parasol Gossip we want noise in the image to make it look grainy. If the digital file is output as a photographic print, the grain effect should show up quite nicely. However, for the effect to be visible in this magazine which is printed on a printing press with a line screen of 150 applied to the images, I need to use a higher Amount setting or apply Unsharp Mask to the image after the Noise is applied.
In other words since the Noise will be somewhat hidden after printing, I need to over emphasize it. My settings are shown in [12]; [13] shows the results.
The only problem with adding noise to the whole image evenly as I did in [13] is that there is too much noise showing up in brighter tones to look truly like film grain. To maintain heavier noise in the dark areas with less in the light areas of the image, I have another approach. The Noise that was applied to [13] is undone (Command/Control Z).
A Curves New Adjustment Layer is generated by selecting Curves from the New Adjustment Layer menu. The composite RGB Curve was dragged downward darkening the image.
See this Curve in [14]. Notice the white square thumbnail in the Curves layer in the Layer Palette in [15]. This is a Reveal All Layer Mask. The next step is to fill this Curves Layer Mask with black to convert it to a Hide all Layer Mask. Black is chosen as the Foreground Colour near the bottom of the tool bar and then: Edit > Fill > Foreground Colour. Or simply use the Fill with Foreground Colour quick keystroke: Command/Control Delete (to fill with Background Colour use Option/Alt Delete).

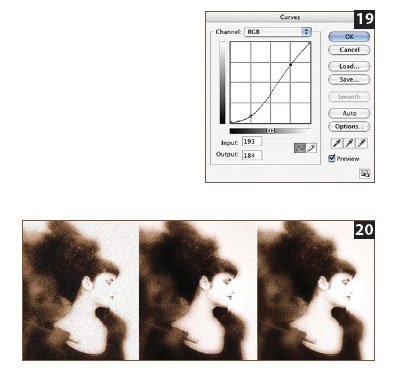
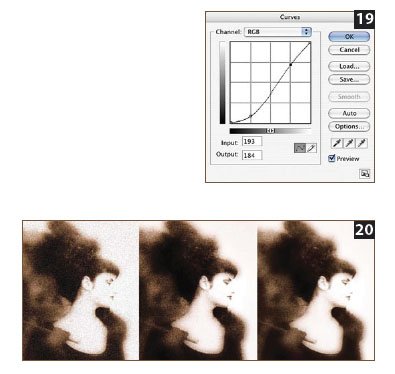
Notice that the Curves Layer Mask thumbnail in the Layers Palette is now black in [16]. Now the effect of the darkening Curve layer is hidden. Noise is added to the Hide All Layer Mask: Filter > Noise > Add Noise > Amount 400% > Uniform > Monochrome (see [17]). The noise added to the black mask is made up of contrasting white pixels. Wherever a white pixel shows up on the black mask, that 15 small portion of the image will be darkened by the darkening curve. Visually this results in dark bits of grain (noise) on the image, which will also darken the image. If these dark grains make the image too dark, use another Curves Layer to correct the brightness. Applying the Add Noise Filter to a Curves Layer Mask rather than to an image layer provides separate control over how visible the noise is in different tonal areas. In Parasol Gossip the RGB composite curve was dragged downwards increasing the noise's visibility throughout the image. Since the curve was pulled down at the ¼-tone point (the darker end of the curve), the noise in the dark areas of the image was emphasized more than in the lighter areas of the image. See this curve's effect on the image in [18]. As mentioned earlier, simulated film grain looks more realistic if the noise is heavier in the dark tones and less in the light tones. With this in mind I dragged the ¾-tone point (brighter end of the curve) up a little to lessen the noise in the light toned faces. See this curve in [19] and its effect on the image in [1] on. For a side-by-side close-up comparison of three different applications of noise to the image see [20]. The image on the left has noise applied to the image layer (close-up of [13] which uses the [14] curve). The center image has noise applied to a Hide All Layer Mask of the curve adjustment layer (close-up of [18] which uses the [19] curve), and the image on the right is similar to the center image except that the ¾-tone portion of the curve was pulled up to reduce the grain effect in the highlight end of the image (close-up of [1]).
Please Note:
There is more than one page for this Article.
You are currently on page 4
- Montizambert Photoshop Impressions page 1
- Montizambert Photoshop Impressions page 2
- Montizambert Photoshop Impressions page 3
- Montizambert Photoshop Impressions page 4
1st Published 01/06/2005
last update 09/12/2022 14:57:51
More Photoshop Articles
There are 0 days to get ready for The Society of Photographers Convention and Trade Show at The Novotel London West, Hammersmith ...
which starts on Wednesday 15th January 2025


