


articles/Photoshop/retouchornottoretouch-page2
by Christina Lauder Published 06/06/2012
Last month a friend of mine asked me if I would produce a video clip or photograph of me to include in a video montageshe was creating for our friend's 40th. What a great idea I thought, but such a shame I need to be in it. I couldn't let her down though. So I set out to produce a photo of myself that I could be happy with.
I'll start out by saying this isn't necessarily the best lit photograph. I didn't use any lighting equipment, just the overcast light from above with the outside of my studio for a backdrop. It wasn't meant to be a professional portrait. I just wanted my snap taken on timer to look slightly better than a snap. The final image is below.
I thought I'd take this opportunity to explain the steps I took here to get the final result, one which I am happy with, as much as any woman could be who still keeps planning the day the exercise and diet will begin.
Before we start I'd like to take a moment to explain that I am including extra detail in my explanation for those not entirely comfortable with Photoshop. I realise this may be overkill for others so I'm putting this text in italics so that if you don't need the extra detail you can skip it and move on.
In The Guardian, Wed 27 Jul 2011, it was reported that L'Oreal was forced to pull ad campaigns featuring Pretty Woman star Julia Roberts and supermodel Christy Turlington, after the advertising watchdog upheld complaints by Liberal Democrat MP Jo Swinson that the images were overly airbrushed.
Swinson complained that images of both celebrities had been digitally manipulated and were "not representative of the results the product (a foundation called Teint Miracle) could achieve". L'Oreal UK admitted that Turlington's image had been "digitally retouched to lighten the skin, clean up makeup, reduce dark shadows and shading around the eyes, smooth the lips and darken the eyebrows". The ASA ruled that both ads breached the advertising standards code for exaggeration and being misleading and banned them from future publication.
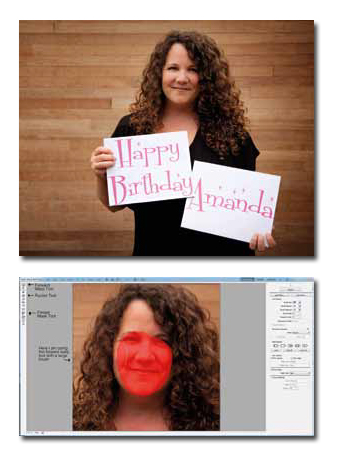
First and in most cases where a woman is involved I begin with the liquify tool. This is a favourite of both mine and those who would have preferred losing a stone or two before their session. I don't see it as something that transforms a woman into someone she isn't. Just something that reduces some of the lumps or bumps. For this exercise I am going to zoom into my face (much to my dismay) so you can hopefully see the changes I've made.
For this example I've decide to reduce the size of my nose also. I wouldn't often do this as I think it's kind of suggesting your subject needs a nose job but if I think I can reduce it slightly without it being obvious and it looks like it could use it then I will. I have even had a few clients request this themselves. To do this I select the Pucker tool with a size big enough to cover the entire nose. Then I lightly and quickly click on the tip of the nose. This will reduce the size without making it look like a different nose altogether.
There are 0 days to get ready for The Society of Photographers Convention and Trade Show at The Novotel London West, Hammersmith ...
which starts on Wednesday 15th January 2025


SWPP - Society of Wedding and Portrait Photographers
The Society of Photographers
Clwyd Chambers, Clwyd Street, Rhyl, Denbighshire, LL18 3LA, UK
Tel 00 44 (0) 1745 356935
Home Page - Find a Photographer - Benefits of Membership - Events and Seminars - Who's who - Photographic Trade Directory - About - Qualification Structure - Mentor Me Programme - Professional Imagemaker Magazine Articles - FREE information pack - Privacy