articles/Postproduction/softskintexture-page1
Soft on Skin Texture - soft on the causes of skin texture! - part 1 of 1 2 3
by Mike McNamee Published 01/01/2006

The "smoothing" of skin tones, particularly for the female portrait, is a topic that is covered patchily in the literature. If you search the indexes for skin smoothing across a shelf of Photoshop books you will get a mixed response. This ranges from absolutely nothing in WOW for Photoshop, Photoshop Artistry, Studio Techniques and Real World Photoshop, through to just a few paragraphs in Martin Evening's Photoshop for Photographers - this last one surprised me a little , but on reflection, most of the models who end up in front of Martin's lens walk through the door with perfect make-up, young skin and gorgeous complexions anyway! At the useful end of the scale, Katrin Eismann deals with the subject in detail in her book Photoshop Restoration and Retouching, and both Jane Conner-ziser and Julianne Kost deal with it extensively in their Software-Cinema DVD's.
vWhat are we doing?
Firstly, we have to understand what we are trying to do. Imperfections in the skin range from slight blemishes, such as moles, over-large freckles, tea-stains (liver spots) and pimples, through to wrinkles, bags under the eyes, crow's feet and whole scale acne. We will not be considering structural problems here, such as sagging eyelids, bent noses and double chins - this is about skin at the macro level!
The Methods
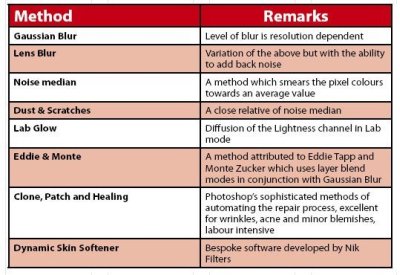
All methods soften the skin by blurring or smearing pixels about to lose detail. This provides a large number of ways of accomplishing the same task and the differences are often very subtle. Some of them are tabled below:
Each has its own devotees and for all of them you can probably find a superbly executed example in one reference or another. This is one of the joys of Photoshop and one of the frustrations for the beginner. Best advice is to try the simpler ones first and, if you want more, go on from that point. Also consider writing actions to get the bulk of the work done, making them give you average layer opacities that you can tweak individually. You might also consider writing a number of actions entitled weak, medium and strong, with differing levels of adjustment.

BASIC RULES
Regardless of the technique employed, there are some universal rules that are worth considering.
Viewing magnification
All retouching should be examined at 100% zoom magnification on screen. Photoshop produces jaggies and other problems when you use the goofy magnifications such as 33.3% and 66.7%. If you need to work at high magnification for precision (say 400%) then you are best to open a second window and keep this at 100% so you don't have to keep zooming between scales. You do this by clicking Window>Arrange>New Window. Now any changes you make in the main window are immediately visible in the second window. Bear in mind that you can close either of the two windows without saving, but you will be prompted to save your work, at the appropriate time.
Raise the Opacity!
All retouching should be carried out on a duplicate layer of the background or face. Then, when you have completed your retouch, you should reduce the layer opacity to zero and bring it slowly up to the correct level, by judgement. For example if you go round a face and systematically remove every wrinkle the model will look like a plastic doll. Dropping the opacity will allow just enough of the "lived in" look to return for realism. This strategy is the most important thing that this feature should teach you, so ignore it at your peril!
A variation on the strategy is to make a retouch procedure and then hide it with a Hide All layer mask. You then have the ability to control the strength of the effect by painting with varying opacities on the layer mask - white for full strength, black for no effect and all shades of grey in between. You also, of course, get spatial control, ie you can selectively avoid blurring eye lashes, lips, eyebrows, jewellery, etc.
You are currently on page 1
- Soft on Skin Texture - soft on the causes of skin texture! page 1
- Soft on Skin Texture - soft on the causes of skin texture! page 2
- Soft on Skin Texture - soft on the causes of skin texture! page 3
1st Published 01/01/2006
last update 09/12/2022 14:59:05
More Postproduction Articles
There are 0 days to get ready for The Society of Photographers Convention and Trade Show at The Novotel London West, Hammersmith ...
which starts on Wednesday 15th January 2025


