


articles/Postproduction/softskintexture-page3
by Mike McNamee Published 01/01/2006
Getting down to Brass Tacks.
We open an image that needs retouching and with Ctrl-J (Cmc-J Mac) make a duplicate layer (I am assuming that levels or colour corrections/management have already been applied to your image). As you see there is a huge blue vein on the right temple, small lines under the eyes and, though hardly noticeable, wispy facial hair above the jaw bone.
Select the clone tool (keystroke S) and set mode to Lighten and opacity to about 25% then with a smallish soft-edge brush, sample the flesh adjacent the dark blemishes and work your way through the lines.
gNow we want a Quick Mask, keystroke q, select a suitable paintbrush and go over all the flesh, but miss areas that are critical for sharp detail, like eyes, eye lashes, eyebrows, nostrils, teeth, lips, etc. By pressing q again you will see the selection you have made, now change your selection to inverse, (Shift+Ctrl I) and duplicate the layer (Ctrl-J) so that you now have the flesh only, on its own layer, by clicking the eyes in the layers palette, you will see. With this layer active go to Filters >Blur>Gaussian Blur - for this example I am up in about the 10 range. As you can see, the girl's complexion now has an almost porcelain, doll-like appearance. If you are satisfied, you can flatten the image and print, but as I mentioned at the beginning, American photographers will now work on the eyes. (see Jane Conner-ziser in September issue - Ed.)
So there you have it - Hollywood-style skin makeover in just a few moments with Photoshop (this example was created in Photoshop 7).
All that remains for this glamour portrait is to flatten the layers, size for printing and send to the printer. Nothing has changed for me; I am still not a big fan of this style of imagery all I can say to justify it is, go back to the first few paragraphs above.
Lens Blur
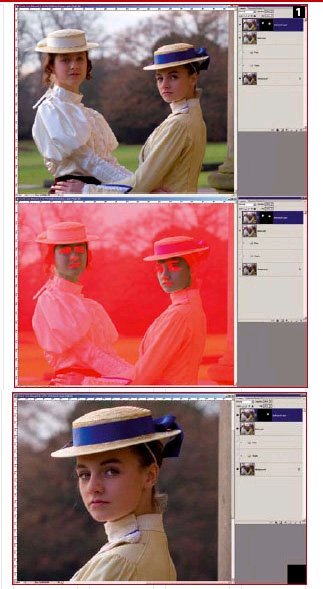
This is a new filter in Photoshop CS and is intended to accurately portray the effects of defocusing due to depth of field. However, it has some interesting features that make it a potential tool for skin softening. As well as not mashing up the colour the way Gaussian Blur does, you can also control and add exact amounts of noise back into the image. The downside of this filter is that it is slow and you have to visit a separate dialogue box to apply it. While you can apply the filter through a depth map, it is probably better to blur the whole image area and then paint back through a Hide All layer mask. The images [1] on the right show the result.
Median, Dust and Scratches These are alternative methods of spreading pixels about. If used on a copy layer and blended with the original using the opacity slider they will work quite well. However they seem to produce banding more easily than other methods and lack some of the sophistication of the preferred method outlined below (Tapp-Zucker).
The Eddie Tapp-Monte Zucker Method
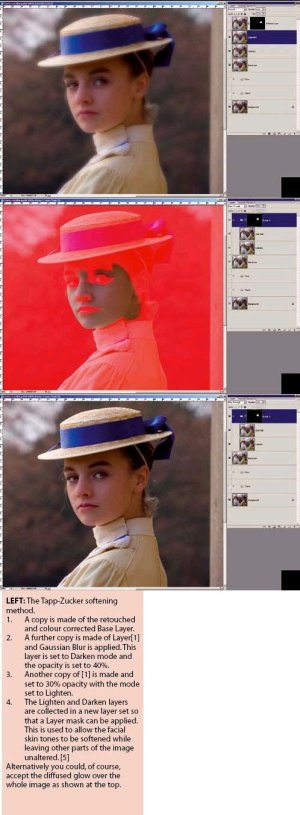
The following method is attributed to Eddie and Monte, who apparently devised it back in the days of Photoshop 4. Essentially you make a copy of the image and then blur it with Gaussian Blur. You then copy the blurred layer. Then you change the blending mode of the lower layer to darken and set the opacity to 40%, then change the blending mode of the upper copy to lighten and set the opacity to 30%. This technique lends itself to the making of an action to get the bulk of the work done and all you have to ensure is that the Gaussian Blur level is correct. Blur is resolution dependent but for reference, Jane Conner-ziser added 9px of blur to a 12.4MB file which was 1800 pixels wide. This would suggest that a start value for the Gaussian Blur would be half% of the width of the image in pixels. In real terms this equates to the values below:
Chart
Note that the blur level rises as the inverse square root of the file size, so it is smaller than you might think. In the image on the right, a value of 11 pixels was used but this was toned down using the opacity slider after the selective masking.
Once you have decided upon the blur level, you flatten the two, blurred layers together or make them into a layer set. This enables you to attach hide all layer masks, so that you can paint back the effect with a white brush, only where you need it.
THE VERDICT
At the end of all this, which method is the best? We go for the Tapp- Zucker method with the proviso that you build an action to carry it out. That way you get the best of quality combined with speed of use.
There are 0 days to get ready for The Society of Photographers Convention and Trade Show at The Novotel London West, Hammersmith ...
which starts on Wednesday 15th January 2025


SWPP - Society of Wedding and Portrait Photographers
The Society of Photographers
Clwyd Chambers, Clwyd Street, Rhyl, Denbighshire, LL18 3LA, UK
Tel 00 44 (0) 1745 356935
Home Page - Find a Photographer - Benefits of Membership - Events and Seminars - Who's who - Photographic Trade Directory - About - Qualification Structure - Mentor Me Programme - Professional Imagemaker Magazine Articles - FREE information pack - Privacy