articles/Presentation/windowmount-page2
Making a Window Mount - part 2 of 1 2 3
by Mike McNamee Published 01/02/2012

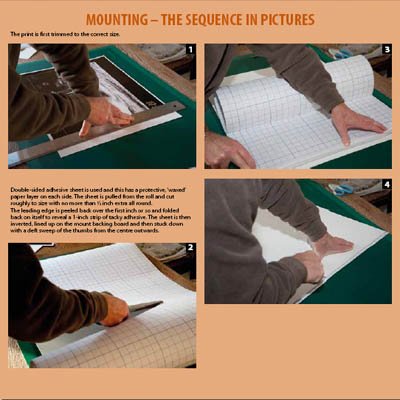
MOUNTING - THE SEQUENCE IN PICTURES
The print is first trimmed to the correct size.
Double-sided adhesive sheet is used and this has a protective, 'waxed' paper layer on each side. The sheet is pulled from the roll and cut roughly to size with no more than 1⁄2 inch extra all round.
The leading edge is peeled back over the first inch or so and folded back on itself to reveal a 1-inch strip of tacky adhesive. The sheet is then inverted, lined up on the mount backing board and then stuck down with a deft sweep of the thumbs from the centre outwards.

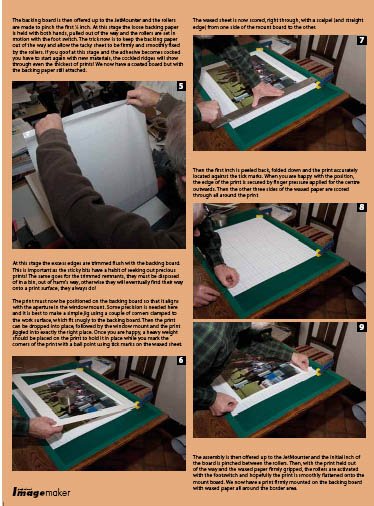
The backing board is then offered up to the JetMounter and the rollers are made to pinch the first 1⁄2 inch. At this stage the loose backing paper is held with both hands, pulled out of the way and the rollers are set in motion with the foot switch. The trick now is to keep the backing paper out of the way and allow the tacky sheet to be firmly and smoothly fixed by the rollers. If you goof at this stage and the adhesive becomes cocked you have to start again with new materials, the cockled ridges will show through even the thickest of prints! We now have a coated board but with the backing paper still attached.
At this stage the excess edges are trimmed flush with the backing board.
This is important as the sticky bits have a habit of seeking out precious prints! The same goes for the trimmed remnants, they must be disposed of in a bin, out of harm's way, otherwise they will eventually find their way onto a print surface, they always do!
The print must now be positioned on the backing board so that it aligns with the aperture in the window mount. Some precision is needed here and it is best to make a simple jig using a couple of corners clamped to the work surface, which fit snugly to the backing board. Then the print can be dropped into place, followed by the window mount and the print jiggled into exactly the right place. Once you are happy, a heavy weight should be placed on the print to hold it in place while you mark the corners of the print with a ball point using tick marks on the waxed sheet.
The waxed sheet is now scored, right through, with a scalpel (and straight edge) from one side of the mount board to the other.
Then the first inch is peeled back, folded down and the print accurately located against the tick marks. When you are happy with the position, the edge of the print is secured by finger pressure applied for the centre outwards. Then the other three sides of the waxed paper are scored through all around the print
The assembly is then offered up to the JetMounter and the initial inch of the board is pinched between the rollers. Then, with the print held out of the way and the waxed paper firmly gripped, the rollers are activated with the footswitch and hopefully the print is smoothly flattened onto the mount board. We now have a print firmly mounted on the backing board with waxed paper all around the border area.
Please Note:
There is more than one page for this Article.
You are currently on page 2 Contact Mike McNamee
1st Published 01/02/2012
last update 09/12/2022 15:00:25
More Presentation Articles
There are 0 days to get ready for The Society of Photographers Convention and Trade Show at The Novotel London West, Hammersmith ...
which starts on Wednesday 15th January 2025


