


articles/Business/areyouwellpresented-page5
by Tom Lee Published 01/11/2006
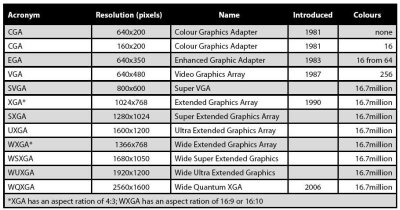
In amongst this mess, the notion of asking for a 1,024 pixel width image for digital image competitions has grown up. This complies with most (but not all) users' systems so that they may comfortably fit an image on their screen. Often for web use, a limit of 800 pixels is specified, to allow for space around the image for the other bits of the web page. This fits nicely with an SVGA resolution image, (800x600 pixels, at 16 million colours), for better quality.
Practical Matters - let's just do it!
Enough theory, let's look how you might go about preparing a file or set of files for web use or even to meet a competition size standard. We will assume thatyou have a standardised area of 800 pixels by 600 pixels into which you must fit your images and that you wish to crop your images for optimum composition so thatthey are of variable aspect ratio. We will also assume that you wish to improve your image presentation with coloured backgrounds, borders and a drop shadow.
1. Make a new file in Photoshop in RGB at 72ppi, with a white background and sized at 800x600 pixels and set your RGB colour space to sRGB if you are aimed for web presentation or perhaps to a DVD for television viewing.
2. Turn on your Rulers (View>Show Rulers) then right click in the ruler bar itself and set your units to pixels. You should now confirm that you have an 800x600 pixel file.
3. Decide if you wish to have a wide, coloured border around each image and if so drag Photoshop Guides to the correct position - we chose 50 pixels. This told us that our images needed to be 700 pixels maximum for landscape format and 500 pixels maximum for portrait format. Save your file as a template by saving itas normal then right clicking on the file icon and making it a Read-Only file.
4. You now have a choice. You can process all your images using the Image Processor facility in Adobe Bridge or drag already-opened images around in Photoshop and scale them manually. As a very rough guide if you have more than five images it is better to do the job from Bridge. Also from Bridge you can highlight just the images you wish to include in your presentation [4A]. Set your size up to 700 wide by 500 high, set your image quality, select sRGB and save with profile and, if you wish, add your copyright note. Set up or choose adestination folder for the processed images.
5. Open your folder of processed in Bridge, then open, in turn, your sized images. Drag each onto a new version of your template file and position the imageagainst the guides. If you hold down the shift key as you drag, the incoming image will automatically be centred [5A].
There are 0 days to get ready for The Society of Photographers Convention and Trade Show at The Novotel London West, Hammersmith ...
which starts on Wednesday 15th January 2025


SWPP - Society of Wedding and Portrait Photographers
The Society of Photographers
Clwyd Chambers, Clwyd Street, Rhyl, Denbighshire, LL18 3LA, UK
Tel 00 44 (0) 1745 356935
Home Page - Find a Photographer - Benefits of Membership - Events and Seminars - Who's who - Photographic Trade Directory - About - Qualification Structure - Mentor Me Programme - Professional Imagemaker Magazine Articles - FREE information pack - Privacy