articles/Photoshop/correctionperfection-page1
Correction Perfection - part 1 of 1 2 3 4 5 6
by Mike McNamee Published 01/04/2011

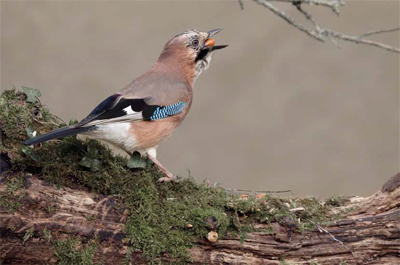
Mike McNamee rolls up his sleeves and gets to work on Jon Ashton's jay
Every so often an image comes along to provide a colour correction challenge that just will not respond to simple global corrections. Difficult corrections arise for a number of reasons principally because there is either mixed lighting or poor lighting about. Mixed lighting can be a mix of say flash and tungsten, but can also arise because of a strongly reflecting object close to the subject. If that object is not present in the image, so that the viewer has no point of reference, then they can be disturbed by the colour-biased impurity. This is typified when a person is photographed with their head coming out of a hedge. The green of the hedge is reflected into all the shadow areas of the face. If you correct the shadows by adding in magenta (to kill off the green) then the remainder of the face looks puce (think Alex Ferguson on a bad day).
If the viewer can see the hedge then it is safe to leave the green tinge in the shadows because the eye expects, and accepts, that it should be green. Take the hedge away, however, and all hell breaks loose because the eye no longer has a point of reference to explain why the shadows are green. Correct the shadows and the face goes magenta and that too looks awful! Poor lighting can be spectrally impure (such as sodium or fluorescent lighting) when effects of metamerism can play havoc with colour rendition.
As an additional complication, sometimes you need to tweak the tones surrounding the main subject to provide a little more emphasis. Traditional vignetting does this, but sometimes a little saturation control can have a subtle effect also.
The lovely jay, taken by regular contributor, Jon Ashton, presented a number of issues. The shoulder of the bird was too cold and had lost saturation by the influx of blue (cool) light from the overcast sky. The underside was too green because the moss was reflecting onto the bird's under-belly. To compound matters further the shadows of the logs were too red/magenta for reasons that we could not determine, but left the log looking a little 'hot'. Time then to get the big guns out and go for highly targeted colour correction. Targeted that is at both narrow portions of the colour spectrum and mask-defined parts of the image.
You are currently on page 1
- Correction Perfection page 1
- Correction Perfection page 2
- Correction Perfection page 3
- Correction Perfection page 4
- Correction Perfection page 5
- Correction Perfection page 6
1st Published 01/04/2011
last update 09/12/2022 14:52:53
More Photoshop Articles
There are 0 days to get ready for The Society of Photographers Convention and Trade Show at The Novotel London West, Hammersmith ...
which starts on Wednesday 15th January 2025


