


articles/Postproduction/depthbluring-page3
by Mike McNamee Published 01/02/2005
This is a new, sophisticated filter, which mimics the effect created by different types of lenses and lens constructions. There is a difference between true blurring due to depth of field effects and simply slamming in a bunch of Gaussian Blur. De-focussing blur varies around the focal plane, rising more quickly toward the lens and less so as you move away into the distance. The shape of off-axis flare spots mimics the shape and number of petals off a lens aperture diaphragm; the curvature of the blades affects the quality of the out of focus blur spot. Gaussian Blur tends to dull the highlights by mashing the darker pixels with the lighter ones. Lens makers such as Nikon (with its defocusing Portrait lens the AF DC 105 f/2) and Hasselblad (with their Softars) have always recognised the subtleties of blurring by proving these lens with controlled ways of destroying their sharpness
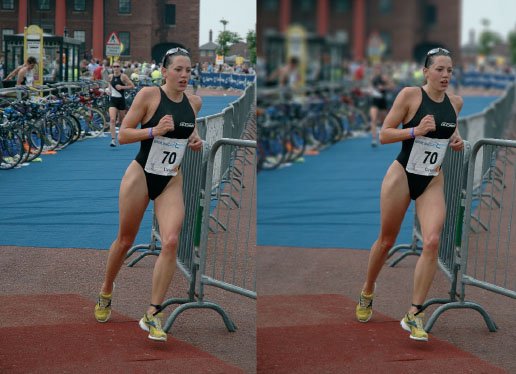
For our example we take a recently published image of a triathlete. Note on the original that the triangular road sign and bus stop legend are legible.The shot was taken at 70mm focal length (zoom lens), at the full aperture of f4.5, on a Nikon D70.The depth of field could do with being a little shallower to create more impact than the restricted aperture could provide. The procedure for making an accurate simulation of shallow depth of field is described below and would apply to most other shots composed in a similar way e.g. a bride walking up a path
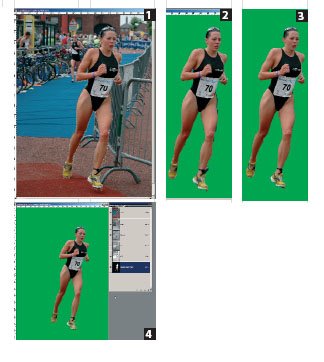
1. The athlete was outlined using the magnetic Lasso Tool [1].This was quite a good cut-out but a little ragged in places, so it was adjusted in Quick Mask mode. [2,3,4].The more accurate selection was then saved as an alpha channel and named "Athlete Sharp Mask" (because it was sharp and hard edged).
2. The Athlete Sharp Mask was duplicated and blurred
3 pixels using Gaussian Blur. This alpha channel was then named Athlete Blurred Mask. This procedure was to provide a more gradual transition between blurred and original image, later on. 3. Now a gradient mask is required which mimics the intensity of sharpness fall off either side of the focal plane - in other words the mask needs to be fully protective (i.e. solid black) around the athlete, but fall away to the front and behind i.e. the mask gradually feathers from black to white (a white mask equals a transparent mask). To do this the Gradient Editor is activated and set up as shown [5] i.e. 90% dense on the extreme left, 100% dense at 14% from the left; then gradually transitioned to clear (white) at the right hand side. Positioning of the controls is a bit of a guess. The rectangle "with a roof" controls the density of a point and the diamond slider controls the location of the mid point of the mix between the density points. The change of blurring as you move away from the plane of focus is hugely complex, depending upon the usual culprits like aperture, focal length, and format to which must be added the shape of the residual lens aberrations and even the shape and quality of the aperture stop itself (which is where we came in, with the Softar!). In truth, as long as the blurring increase gradually, the observer will be fooled, especially if the masking is accurate around the main subject. Once the gradient tool is set up, a linear gradient is dragged from the bottom to the top of the image [6] on a new Alpha Channel 1.
There are 0 days to get ready for The Society of Photographers Convention and Trade Show at The Novotel London West, Hammersmith ...
which starts on Wednesday 15th January 2025


SWPP - Society of Wedding and Portrait Photographers
The Society of Photographers
Clwyd Chambers, Clwyd Street, Rhyl, Denbighshire, LL18 3LA, UK
Tel 00 44 (0) 1745 356935
Home Page - Find a Photographer - Benefits of Membership - Events and Seminars - Who's who - Photographic Trade Directory - About - Qualification Structure - Mentor Me Programme - Professional Imagemaker Magazine Articles - FREE information pack - Privacy