


articles/Postproduction/depthbluring-page4
by Mike McNamee Published 01/02/2005
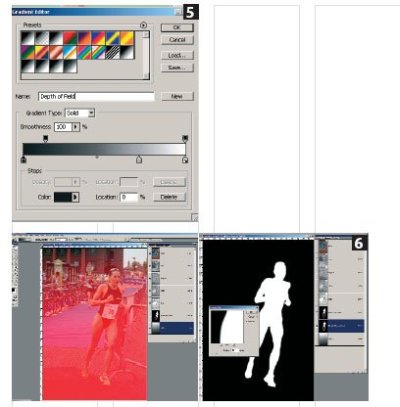
4. The "contents" of the Athlete Blurred Mask are now added to Alpha Channel 1.This is done by Ctrl-clicking Athlete Blurred Mask (in the Channels Palette) to load it onto Alpha Channel 1 [7]. It is then filled with black [8]. Later this will completely protect the athlete from the effects of the lens blur filter. This Alpha Cannel 1 is then renamed "Composite Mask".
5. The Lens Blur Filter is activated (Filter>Blur>Lens Blur) and then the "Composite Mask" is selected to provide the depth map [9].
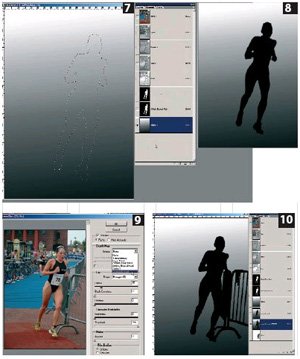
6. There are many refinements to be made for absolute realism. For example the barriers by the athlete's left hand should be sharp, but the background behind them should be blurred. We made this refinement by adding a black shape of the barriers to the "Composite Mask", renaming it "Composite Mask REFINED" and then selected that to provide the depth map. Note that although this portion of the mask is quite crude it is adequate for the job [10].
Postscript
If you are now confused by the two options set out in this feature, lets Simmplify for you. If it is a quicky for a card, the web or a small image, go for the Dave Simm method. If you are looking for an advertising image, a portfolio image or a competition entry, the 20 minutes to do the job using graduated masks is well worthwhile. Your other option is to buy that 85mm f1.8 jobbie you always hankered after as a youth!
We have not described all of the settings in the Lens Blur dialogue. These change the shape of out of focus iris flare spots, number of blades and curvature. If you make a gradient on an alpha channel and then click on the image the Blur Focal Distance is activated and the blurring is adjusted around that point. You can control the dulling of highlights by dropping the Threshold and altering the Brightness to taste. Finally you can add back noise to overcome the smoothing of the blur filter (which can make the image look a little unreal if left without noise). The Photoshop Help file is vague on this topic but for registered users the Adobe studio web site (studio.adobe.com) provides additional guidance. We found little help in any of the manuals and books at our disposal. Overall the technique we described above, which does not use all the whistles and bells, seems the best approach!
There are 0 days to get ready for The Society of Photographers Convention and Trade Show at The Novotel London West, Hammersmith ...
which starts on Wednesday 15th January 2025


SWPP - Society of Wedding and Portrait Photographers
The Society of Photographers
Clwyd Chambers, Clwyd Street, Rhyl, Denbighshire, LL18 3LA, UK
Tel 00 44 (0) 1745 356935
Home Page - Find a Photographer - Benefits of Membership - Events and Seminars - Who's who - Photographic Trade Directory - About - Qualification Structure - Mentor Me Programme - Professional Imagemaker Magazine Articles - FREE information pack - Privacy