articles/Monochrome/mike-mono-page8
Monochrome - choice of the connoisseurs - part 8 of 1 2 3 4 5 6 7 8 9 10 11
by Mike McNamee Published 02/02/2015

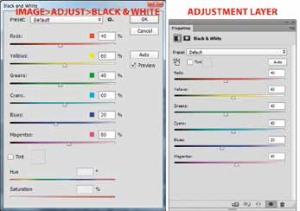
The settings in the Channel Mixer which mimic the effect of contrast filters are listed in the table and should be applied to a full colour image, but with the monochrome option checked. The settings have been changed in recent versions of Photoshop (CS onwards - we think!). The sliders used to be centred but are now pushed right over towards the right and are marked as plus or minus 100%. They now show default values of 40, 40, 20 for R, G and B respectively. In practice you may find that the differences between the settings are quite subtle. You may also care to also boost contrast changes further using curves to add to the Channel Mixer effect.
The arrival of digital changed the way we tend to think about bending monochrome conversions. Use of selective colour and colour range adjustments means that the control can be as localised as you are prepared to make it (by investing Photoshop time into the image).
However, in landscape work, the ability to improve haze control with progressively less blue filters (ie yellow through to red) is something that Photoshop cannot do. There remains the option to use the filter on a digital camera (to cut haze) and then deal with the (coloured) image file later. The response of a digital chip will not match that of a monochrome emulsion so you may not obtain the result you would get from your analogue workflow. A polarising filter will create a more realistic (ie fullcoloured) image while also cutting through haze; the atmospheric effect is actually the result of polarisation of reflected light around particulates in the atmosphere.

The Black and White Panels
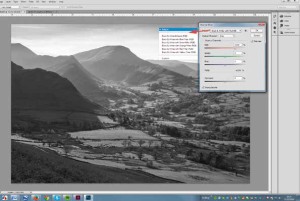
This adjustment is available in Photoshop as both an Adjustment Layer or a straight adjustment (via the Image>Adjustments panel). The dialogue panels have slightly different layouts of the same basic adjustments. The sliders provide for the primary and secondary tones only (ie less than the ACR dialogue) but have an additional check box for 'Tint', which defaults to sepia but the usual colour picker is available by clicking the colour icon. Pantone tints are also available via the Color Picker.
If you select the scrubby slider and then click in the image and move it to the right or left you can lighten or darken those colours close to the initially selected area. The drop-down menu provides some of the traditional complementary filters along with infrared. Should you develop a preferred set of parameters, these may be saved as a preset of future use.
One of the better methods for working with this feature is to choose the 'auto' button for your starting sessions and then perform your final tweaks from there. As with all image manipulation moves you should keep a watch for clipping and posterisation if you are tempted to use sliders at their full range. This is not possible in real time in the way you can with a Raw file and the ACR interface. When you have completed your adjustments, go to the Levels panel and click on the highlight or shadows slider while holding down the Alt key. This reveals clipping. This, in itself, is a good reason to employ an Adjustment Layer rather than a direct adjustment. If you use an Adjustment Layer you can go back to its settings, make a further adjustment and then recheck for clipping. This method only creates a single interpolation of pixels and hence less pixel damage. Over-manipulation at any stage of the digital workflow is likely to cause pixel damage (also quaintly referred to as 'pixel decimation'). To the viewer, pixel damage manifests itself as artefacts in the image, or posterisation of blocks of similar colours. Depending upon the level of damage and the scale of the print, the consequences range from undetectable to unacceptable.
Please Note:
There is more than one page for this Article.
You are currently on page 8
- Monochrome - choice of the connoisseurs page 1
- Monochrome - choice of the connoisseurs page 2
- Monochrome - choice of the connoisseurs page 3
- Monochrome - choice of the connoisseurs page 4
- Monochrome - choice of the connoisseurs page 5
- Monochrome - choice of the connoisseurs page 6
- Monochrome - choice of the connoisseurs page 7
- Monochrome - choice of the connoisseurs page 8
- Monochrome - choice of the connoisseurs page 9
- Monochrome - choice of the connoisseurs page 10
- Monochrome - choice of the connoisseurs page 11
1st Published 02/02/2015
last update 09/12/2022 14:56:44
More Monochrome Articles
There are 0 days to get ready for The Society of Photographers Convention and Trade Show at The Novotel London West, Hammersmith ...
which starts on Wednesday 15th January 2025


