


articles/Monochrome/mike-mono-page9
by Mike McNamee Published 02/02/2015
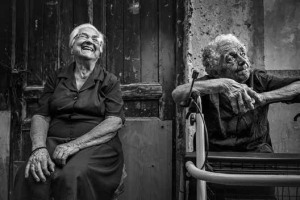
When the image content is strong, people rarely pose the question "How was this translated into mono?", the image is strong enough to fly right over such worldly considerations! Vagelis Giotopoulos nominated in the Monochrome category
This part of the discussion raises the issue of 16-bit versus 8-bit workflows. For heavily manipulated images you may find that posterisation appears, usually as banding in smooth areas of tone such as skies. This is one reason why manipulation in the Raw file is preferred as the file is closer to 16-bit than 8-bit (depends upon the camera). Some practitioners swear by 16-bit but it is often without sound objective testing to back their claims! Although a downside of 16-bit is the doubling of the file size, the modern computer is more than capable of handling the extra. There are caveats also - never ever send a 16-bit file to press, they cause mayhem!
In many instances, and particularly for a 'straight' print, the image might now be ready for proofing and/or curating. However, you may wish to make a more expressive print using selective dodging and burning and selective changes to image contrast.
The Advanced Black and White Driver
This is an Epson driver which is installed in their more serious printers. We have written on the subject before, but it is worth repeating. The driver takes out the strong cyan and strong magenta inks, leaving the remainder to create the monochrome. The yellow, light magenta and light cyan are kept active so that toning can be applied at the printing stage. One technical advantage is that, in the absence of strong colourants, it is more difficult to create colour-biased monochromes when a pure neutral effect is desired - it is more forgiving of machineto- machine variations.
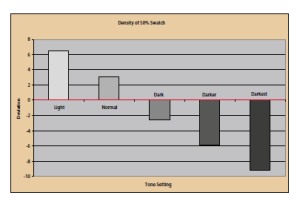
To use ABW, the printing interface has to be set to 'Printer Manages Color' and then in the set-up for the Mac you have to select the Epson Color Management radio button. Where the Color drop-down click to disclose the list and choose the Advanced Black & White option. If you then also choose 'custom' and then 'advanced' you get access to all the bells and whistles. The two most important are the tone, which makes the printer darker or lighter by 4% for each option, and the colour wheel in which the tone may be set by dragging the mouse or by typing the numbers in the boxes. The colour shifts are small, 10-points produces only 1 Lab point of colour shift in the print. This means that we have a very sensitive tool at our disposal. You do not require bespoke settings for third-party paper but you do have to make a good guess at the media setting.
There are 0 days to get ready for The Society of Photographers Convention and Trade Show at The Novotel London West, Hammersmith ...
which starts on Wednesday 15th January 2025


SWPP - Society of Wedding and Portrait Photographers
The Society of Photographers
Clwyd Chambers, Clwyd Street, Rhyl, Denbighshire, LL18 3LA, UK
Tel 00 44 (0) 1745 356935
Home Page - Find a Photographer - Benefits of Membership - Events and Seminars - Who's who - Photographic Trade Directory - About - Qualification Structure - Mentor Me Programme - Professional Imagemaker Magazine Articles - FREE information pack - Privacy